This Blog is about how to setup a graphical LINUX "Remote Desktop" for connecting to (and working on) a WINDOWS machine. For instance you want to connect yourself from your LINUX machine at home to your (running) WINDOWS job machine in town over the internet, because you need to try out something with InternetExplorer.
To achieve that, two pieces of software must be installed on your LINUX:
In this tutorial the name of the VPN server in the remote network will be vpn.workflow.com, and the IP address of the target WINDOWS machine in that network will be 192.168.1.123. The name of the VPN login user will be fridell, and the name of the login user of the target WINDOWS machine will be franzen.
Here is a link to a similar tutorial.
A virtual private network makes it possible that your machine is in a local network that actually is not local but remote. In other words, you start a VPN connection and then have the machines of the remote network with their local addresses (192.168.X.Y) in your own network.
There are several implementations of VPN:
For a WINDOWS machine you need the Microsoft PPTP. For a VPN connection you need the name of the VPN server (that must be available via internet), and you must have a login on that server.
On Ubuntu systems, a VPN client software should be pre-installed. So you only need to configure and start it. You won't need to be superuser for this.
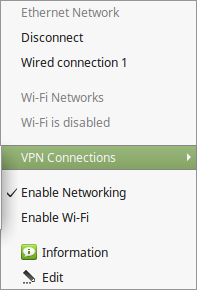
Somewhere on what is the "taskbar" of your Ubuntu, there is a "system tray" icon that represents active network connections. When you left-click it, a menu should open, showing all possible connections. In that menu, an item "VPN Connections" should be present. (When not, go to the internet and find out how to install VPN client, this should be easy.)
You now must add a VPN connection of type PPTP. Use the "Edit" item in that menu to do that. In the upcoming dialog, click "Add". You will be asked for a connection type, choose PPTP. (When this is not present, you need to install VPN PPTP first, see above).
In the following dialog you must enter the connection data of the network you want to connect to, which includes
Do not yet close this dialog. Click on "Advanced" and
These setting might be network-specific, but for me nothing else worked. See also this page recommending these settings.
Commit and "Save" your configuration. You can close the network dialog now. After this you should see your new connection in the system tray network icon menu.
Click on the item to activate the connection. Mind that when you do this for the first time, a dialog will ask you for your password to access the "VPN secrets". The password you must enter here is the password of your local machine, not the one of the VPN server.
When the menu item has a hook now, it worked. When not, check user name, password and domain name for correctness.
When something goes wrong, you will have to perceive that reporting errors is not a strength of NetworkManager. But at least there is a command line interface for experimenting. You can open a terminal window and work with nmcli (network manager command line interface):
# list all connections
nmcli con
# start a connection, using the name of the VPN connection
nmcli con up id"Workflow VPN"
# stop a connection
nmcli con down id"Workflow VPN"
Mind that you don't need to be superuser to do this. When you do this as superuser, other problems might occur that are not related to the real one. (You definitely don't want to expose your password in some configuration file!)
When you succeed to run the VPN connection, you should be able to ping the machine you would like to connect to after:
ping192.168.1.123
When not, you can try to understand the logging output of NetworkManager. On Ubuntu it appends to the file /var/log/syslog. In my case I actually found a trace of what was wrong:
tail -200 /var/log/syslog | egrep "auth|terminat|error"

Mar 28 11:40:11 fricat pppd[3900]: MS-CHAP authentication failed: E=648 Password expired
Mar 28 11:40:11 fricat pppd[3900]: CHAP authentication failed
Mar 28 11:40:11 fricat pppd[3900]: Connection terminated.
This is a network tool that comes with SFTP and SSH protocols out of the box, but not with RDP (remote desktop protocol) what you need for WINDOWS. You must add the RDP plugin explicitly when you install it. When you forget this and install the plugin later, you need to quit the Remmina application explicitly, because it does not quit by default when you close it (and thus would not know about its new plugin then).
Go to your preferred software install tool, Synaptic or whatever, and search for "Remmina". You should find this easily without adding additional Ubuntu download repositories. Activate it for installation, then search for "remmina-plugin-rdp" and also activate it. Apply the installs.
What remains to do is configure Remmina to connect to your WINDOWS machine. You should be able to find it in your main menu after installation. Launch it and then click "Connection" - "New". Now you must configure the WINDOWS machine you want to connect to (other than with VPN where you configured the remote VPN server).
Choose RDP as protocol, then enter the IP address of the target machine and your login user and password. Most likely you will not need the WINDOWS domain name any more here.
After creating the connection, click "Connect" when having it selected. A window should open showing your remote WINDOWS desktop - yes, it is real :-)
It took me some hours to achieve my LINUX remote desktop. I did not know whether such is possible before. I hope I made life easier for all that would like to have the same. Thanks to all the eager LINUX programmers that write these applications!
ɔ⃝ Fritz Ritzberger, 2015-03-25