Window systems handle a combination of devices: one or more screens, a keyboard and a pointing device, such as a mouse, with one or more keys.
A screen provides a rectangle filled with pixels, points that can be lit in a number of colors. The number of pixels and colors depends on the capabilities of the hardware, such as the available memory for storing screen contents in a video card and the various assets of a monitor. Since the screen's resolution (i.e. the number of pixels per some unit of measure) and the screens dimensions may vary, programs striving for portability may have to take a conservative approach.
An X Windows Server is a computer system that is capable of displaying screen images composed using X Window features, and accepting inputs from the usual devices, i.e., keyboard and mouse.
An X Windows Client is an application that connects to an X Windows Server. It may execute on the same system as the server, or it may run on some other computer that is somehow connected to the system running the server. A frequent scenario for this happens when you login on a remote system and instruct the that system that your display is on the system where you logged in from. (It wouldn't help you much if the display were visible on the remote system, right?)
Many applications may make use of the same X Windows Server at the same time, and that's what happens most of the time. Usually all the clients are run by the same user who is sitting in front of the server's monitor. With all of these programs competing for "real estate" (the monitor's display area), it wouldn't be easy for the client programs to provide features that would make this manageable. This is where an important program comes to the rescue: the Window Manager.
A Window Manager can be seen as a gopher between the user and the X Windows Server. It processes certain input events that aren't really of interest to the client application but of a more general nature. For instance, the mouse operation to click and drag a window's title bar to move the entire window doesn't concern the application - it should continue to display whatever it is displaying - but the the X Window Server which will follow the mouse movement and relocate the window.
Nevertheless, it's possible for an application to communicate with its Window Manager as well. It may request certain services, or instruct the Window Manager to handle certain situations in a specific way.
use Tk;

my $winMain = MainWindow->new();
my $butHello = $winMain->Button(
  -text    => 'Hello',
  -command => sub { print "Hello, world\n"; },
);
$butHello->pack( -side => 'left' );

MainLoop();
The statement use Tk; includes the Tk package which in turn
includes other packages such as Tk::Widget, Tk::Image
and Tk::MainWindow. The latter is a Perl class, providing you
with the constructor new to create a main window, an instance of
a Toplevel object:
my $winMain = MainWindow->new()This call follows the traditional OO programming pattern for constructors, Class->constructor(arguments). The returned value is an object reference to the created window.
Container widgets such as Toplevel or Frame have methods that are constructors for internal windows, again returning an object reference to the created widget:
my $butHello = $winMain->Button(
  -text    => 'Hello',
  -command => sub { print "Hello, world\n"; },
);
Here the call exhibits a somewhat different pattern:
object->widgetclass(arguments),
which is simply an instance of the traditional method invocation
object->method(arguments).
Required arguments (if any) are written in positional notation, whereas
the ubiquitious option-value pairs are traditionally written as
key => value, so that there is no need for
quotes around the key string.
Widget appearance and behaviour is controlled by setting options, either when the widget is created or later, using some reconfiguration method. Program activities are tied to events, triggered by some user action on a widget, such as clicking a mouse button or pressing a key. Therefore, the processing model of a Perl/Tk application consists of two stages:
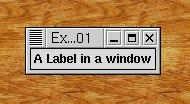
use Tk;

my $winMain = MainWindow->new();
my $labA = $winMain->Label( -text => 'A Label in a window' );
$labA->pack( -side => 'top' );

MainLoop();
use Tk; makes the entire Tk package available.
This consists of a vast number of classes representing the different
widget categories such as MainWindow or Label.
To create a widget you use a constructor method which will return a
reference to the created object. For a main window - the topmost widget
in a hierarchy - this is MainWindow->new. Widgets subordinate
to another widget are constructed by applying some constructor (the name of
a widget class) to the parent's object reference.
Options passed to a constructor determine the widget's properties. For
a label, just the -text option together with a string value is
required. (Other options assume some default value.)
The placement of some widget within its parent (and relative to
its siblings) is determined by some geometry management method
applied to the widget. Here, the pack command is used, which
is quite sufficient for simple tasks.
Creating a widget and packing it into its parent can be done in one expression, particularly where it is not necessary to remember the widget's object reference for later access:
$winMain->Label(
  -text => 'A Label in a window'
)->pack( -side => 'top' );
After the main window with its widget hierarchy has been constructed
Tk is given control to process window events such
as mouse actions or keystrokes. This is done by calling
MainLoop(), Tk's event handling loop.
However, this simple example does not provide any features for user
interaction. Only the standard operations provided by the window
manager are possible: iconify and deiconify, maximize and
return to normal size, resizing, and destroy.
Tk::Label, Tk::MainWindow.
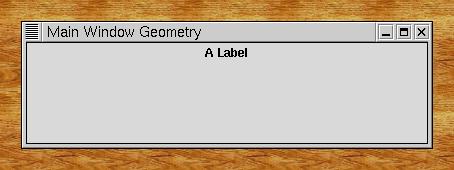
use Tk;

my $winMain = MainWindow->new();
$winMain->title( 'Main Window Geometry' );
$winMain->iconname( 'MWGeom' );
$winMain->geometry( '400x100-0+0' );

my $labA = $winMain->Label( -text => 'A Label' );
$labA->pack();

MainLoop();
title method changes the text displayed on the
title bar of your main window. The iconname does the same
for the text displayed along with the window's icon. The geometry
method influences the window's initial width and height, and it's position on
the screen. The argument is a string according to the pattern
widthxheight+xoffset+yoffsetUse - instead of + if the offset is between the right hand or bottom side window and screen borders rather than between the left hand or top side borders. All values are in pixels.
Window managers tend to have their own idea on how to place a window. There are window managers capable of doing what is called "smart placement", or they may even leave initial placement to the user. They must permit for the client to overrule this behavior.
Using constant pixel values for geometry management is, in general, not a good idea, since resulting distances are device dependent.
Tk::Label, Tk::MainWindow, Tk::pack.
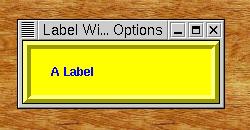
use Tk;

my $winMain = MainWindow->new();
$winMain->title( 'Label Widget Options' );

my $labA = $winMain->Label(
   -text        => 'A Label',
   -foreground  => 'blue',
   -background  => 'yellow',
   -width       => 20,
   -height      =>  3,
   -anchor      => 'w',
   -relief      => 'ridge',
   -borderwidth => 8,
   -padx        => 20,
   -pady        => 2,
 );
$labA->pack();

MainLoop();
The width and height of a label's text area can be set with the -width and -height options. The units for these values are a font's digit character width and the linespacing distance, respectively. By default, these values are derived from the bounding box surrounding the displayed text. (Setting these values explicitely may truncate text.)
The position of the displayed text within the text area can be controlled with the -anchor option. The default is 'center'. Other values are the principal 8 directions of the compass: 'n', 'e', 's', 'w', 'ne', 'nw', 'se', and 'sw'. It may be useful to set -anchor even when the text area is taken from the text's bounding box because the widget may be packed so that its area grows and shrinks with the encompassing frame or window.
Some 3D effects can be achieved with the -relief option by using a value other than 'flat' (the default) in combination with the -borderwidth option: 'raised' and 'sunken' put an ascending or descending border (of the indicated border width) around the label's inner area; 'groove' and 'ridge' create appropriate appearances. These options may be accompanied by the -borderwidth option to set the width of the border.
The options -padx and -pady add to the width and height of the widget's inner area.
Tk::Label, Tk::MainWindow, Tk::pack.
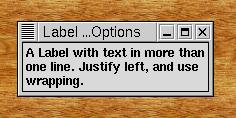
use Tk;

my $winMain = MainWindow->new();
$winMain->title( 'Label Widget Options' );

my $labA = $winMain->Label(
   -text       => 'A Label with text in more ' .
                  'than one line. Justify left, ' .
                  'and use wrapping.',
   -justify    => 'left',
   -wraplength => 200,
);
$labA->pack();

MainLoop();
Alternatively, newlines can be inserted in the text string:
my $labA = $winMain->Label(
   -text       => 'A Label with text in
more than one line.
Justify left.',
   -justify    => 'left',
);
Tk::Label, Tk::MainWindow.
A label's text could also be set from the current value of a variable, thereby avoiding the necessity of explicitly updating the widgets configuration. See Pressing a Button.
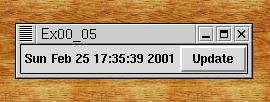
use Tk;

my $loctim = localtime();
my $winMain = MainWindow->new();
$winMain->Label(
  -textvariable => \$loctim,
)->pack( -side => 'left' );
$winMain->Button(
  -text    => 'Update',
  -command => sub { $loctim = localtime(); },
)->pack( -side => 'left' );

MainLoop();
Callbacks may be written as an anonymous subroutine, a code reference, or a reference to an array containing a subroutine reference and parameters to be passed to it.
Tk::Label, Tk::MainWindow, Tk::Button.
A button couild also be labelled with a graphic design. This is discussed in the chapter Bitmap on a Button.
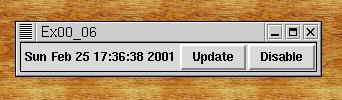
use Tk;

my $loctim = localtime();

sub toggleState($$){
  my( $control, $action ) = @_;
  my $text = $control->cget( -text );
  if( $text eq 'Disable' ){
    $control->configure( -text => 'Enable' );
    $action->configure( -state => 'disabled' );
  } else {
    $control->configure( -text => 'Disable' );
    $action->configure( -state => 'normal' );
    $action->flash();
  }
}

my $winMain = MainWindow->new();
$winMain->Label(
  -textvariable => \$loctim,
)->pack( -side => 'left' );
my( $butTime, $butCtrl );
$butTime = $winMain->Button(
  -text    => 'Update',
  -command => sub { $loctim = localtime();
                    $butCtrl->invoke(); },
  -activeforeground => 'red',
  -state      => 'normal',
);
$butTime->pack( -side => 'left' );
$butCtrl = $winMain->Button(
  -text    => 'Disable',
  -command => sub { toggleState( $butCtrl, $butTime ); },
);
$butCtrl->pack( -side => 'left' );

MainLoop();
If a button's -state option value is 'normal', it can be activated. Setting -state to 'disabled', its appearance changes, and no action is possible.
The flash method (called for the button labelled "Update" when it is activated) redisplays the button several times, alternating between active and normal colors.
Another useful technique for letting the user know about the state of your program is implemented here by changing the text of a widget.
Tk::Label, Tk::MainWindow, Tk::Button.
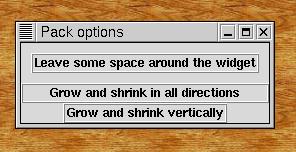
use Tk;

my $winMain = MainWindow->new();
$winMain->title( 'Pack options' );

$winMain->Label(
  -text   => 'Leave some space around the widget',
  -relief => 'ridge',
)->pack( -padx => 10, -pady => 10 );

$winMain->Label(
  -text   => 'Grow and shrink in all directions',
  -relief => 'ridge',
)->pack( -expand => 'yes', -fill => 'both' );

$winMain->Label(
  -text   => 'Grow and shrink vertically',
  -relief => 'ridge',
)->pack( -expand => 'yes', -fill => 'y' );

MainLoop();
Tk::Label, Tk::MainWindow.
It is not always useful to let the user resize a window. This is shown in the chapter How to Restrict Resizing of a Window
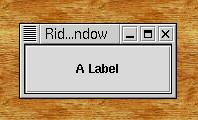
use Tk;

my $winMain = MainWindow->new();
$winMain->title( 'Ridgid Window' );
$winMain->Label(
  -text   => 'A Label',
  -relief => 'groove',
  -width  => 20,
  -height => 3
)->pack();

$winMain->update();
$winMain->minsize( $winMain->width(),
                   $winMain->height() );

MainLoop();
Similarly, setting maxsize avoids extending a window beyond the given bounds.
To inhibit any changes simply use
$winMain->resizable( 'no', 'no' );with a boolean value for the x- and the y-dimension.
Tk::Label, Tk::MainWindow, Tk::WM.
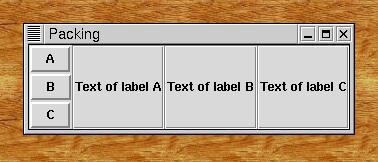
use Tk;

my $winMain = MainWindow->new( -background => 'white' );
$winMain->title( 'Packing' );

my $frmCol = $winMain->Frame();
$frmCol->pack( -side => 'left' );

my %lab;
for my $tag ( qw( A B C ) ){
  $frmCol->Button(
    -text    => " $tag ",
    -command => sub { print $lab{$tag}->cget( -text ),"\n"; },
  )->pack();
}
my $fil = 'both'; # or 'x' or 'y' or 'none'
my $exp = 'yes';  # or 'no'
for my $tag ( qw( A B C ) ){
  $lab{$tag} = $winMain->Label(
    -text   => "Text of label $tag", -relief => 'groove',
  )->pack( -side => 'left', -fill => $fil, -expand => $exp );
}

MainLoop();
First we create a frame widget subordinate to the main window. Into it we pack three buttons, by default from top to bottom. The we add label widgets to the main window, continuing to pack from left to right.
With rectangles of arbitrary dimensions being packed together into one big rectangle, chances are that some slack space crops up next to some of the packed rectangles. Options of the pack method define how to handle that extra space:
Tk::Frame, Tk::MainWindow, Tk::WM.
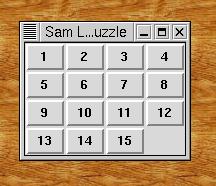
use Tk;

my $winMain = MainWindow->new();
$winMain->title( "Sam Loyd's 14-15-Puzzle" );

my @but;
sub slide($$){
  my( $r, $c ) = @_;
  foreach my $d ( [$r,$c+1], [$r-1,$c], [$r,$c-1], [$r+1,$c] ){
    my( $dr, $dc ) = @$d;
    next if $dr < 0 || $dr > $#a || $dc < 0 || $dc > $#a;
    if( $but[$dr][$dc]->cget( -text ) !~ /\d/ ){
      $but[$dr][$dc]->configure(
        -text => $but[$r][$c]->cget( -text )
      );
      $but[$r][$c]->configure( -text => '  ' );
      return;
    }
  }
}

for my $row ( 0..3 ){
  for my $col ( 0..3 ){
    my $num = $row*4 + $col + 1;
    $but[$row][$col] = $winMain->Button(
      -text    => $num < 16 ? $num : '  ',
      -relief  => $num < 16 ? 'raised' : 'flat',
      -command => [ \&slide, $row, $col ],
    );
    $but[$row][$col]->grid( -row => $row, -column => $col,
                            -sticky => 'nsew' );
  }
}

MainLoop();
slide, which checks whether the button
is next to the empty position, and if it is, uses cget
and configure to change these two widgets.
Solving this with pack would require using frames for, say, the rows and then stacking the rows.
The solution does not show the options and code required for creating square, fixed size buttons.
Tk::grid, Tk::Button, Tk::MainWindow.

use Tk;

my $loctim  = localtime();
my $doPrint = 0;
my $winMain = MainWindow->new();
$winMain->Label(
  -textvariable => \$loctim,
)->pack( -side => 'left' );
$winMain->Button(
  -text    => 'Update',
  -command => sub { $loctim = localtime();
                    print "$loctim\n" if $doPrint;
                    $doPrint = 0; },
)->pack( -side => 'left' );
$winMain->Checkbutton(
  -text     => 'Print',
  -variable => \$doPrint,
)->pack( -side => 'left' );

MainLoop();
The on- and off-values are 1 and 0 by default, but can be chosen arbitrarily with the -onvalue and -offvalue options.
Tk::Checkbutton, Tk::Button.
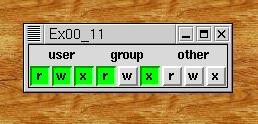
use Tk;

my $winMain = MainWindow->new();

my %right = (
  user  => { r => 1, w => 1, x => 1 },
  group => { r => 1, w => 0, x => 1 },
  other => { r => 0, w => 0, x => 0 },
);
my $col = 0;
for my $who ( qw( user group other ) ){
  $winMain->Label(
    -text => $who,
  )->grid( -row => 0, -column => $col, -columnspan => 3 );
  for my $acc ( qw( r w x ) ){
    $winMain->Checkbutton(
      -text        => $acc,
      -width       => 2,
      -selectcolor => 'green',
      -variable    => \$right{$who}{$acc},
      -indicatoron => 0,
    )->grid( -row => 1, -column => $col++ );
  }
}
MainLoop();
The -indicatoron option with a value of 0 avoids the usual box. Instead, the entire widget area is either sunken or raised, with appropriate changes in color, to represent the selected or deselected state. We use the -selectcolor option with the 'green' value, since the default 'red' looks too forbidding.
The grid method enables us to center a heading above a triplet of checkbutton widgets. The value of the -columnspan option indicates the number of cells the label widget should occupy.
Tk::Checkbutton.
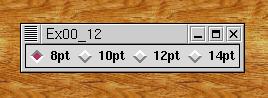
use Tk;

my $winMain = MainWindow->new();
my $pointsize = '10pt';
foreach my $psize ( qw( 8pt 10pt 12pt 14pt ) ){
  $winMain->Radiobutton(
    -text     => $psize,
    -variable => \$pointsize,
    -value    => $psize,
    -command  => sub { print "size: $pointsize\n"; },
  )->pack( -side => 'left' );
}
MainLoop();
Since each radiobutton is a widget in its own right, bundling them into a group depends on their sharing a single variable. A selection is reflected by setting this variable to the value associated with the selected radiobutton. On the other hand, setting the variable to one of these values results in selecting the corresponding radiobutton.
Radiobuttons (such as any other widget permitting user interaction) feature an option to define a command that is invoked whenever some user action occurs.
From an abstract point of view, there is no difference between a set of a mere two radiobuttons and a (single) checkbutton. Nonetheless, there appears to be a clear distinction when one is preferred over the other: Decisions where there is no chance of a third (or fourth) alternative cropping up are best expressed by a checkbutton. On the other hand, a set of choices that is, by chance, limited to two, is better represented by a pair of radiobuttons.
Tk::Radiobutton.
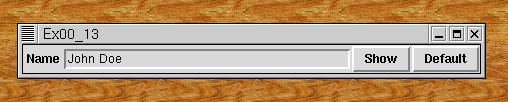
use Tk;

my $winMain = MainWindow->new();
my $default = 'John Doe';
my $name    = $default;
$winMain->Label(
   -text => 'Name'
)->pack( -side => 'left' );

my $entName = $winMain->Entry(
   -width => 40,
   -textvariable => \$name
);
$entName->pack( -side => 'left' );
$winMain->Button(
   -text    => 'Show',
   -command => sub{ print 'Name: ', $entName->get(), "\n"; }
)->pack( -side => 'left' );
$winMain->Button(
   -text    => 'Default',
   -command => sub{ $entName->delete( 0, 'end');
                    $entName->insert( 'end', $default ); }
)->pack( -side => 'left' );

MainLoop();
The widget's text can be accessed either through a text variable which is connected with the -textvariable option, or by using the get, delete and insert methods.
The -width option is used to request a width of the given number of (average size) characters for the field. If the text is wider than the prescribed widget size, long text will scroll horizontally. Setting -widht to 0 causes the widget to grow and shrink with the length of the contained text. (This may also affect the size of surrounding widgets.)
Contrary to some other widgets, the entry widget does not provide for the definition of some command to be executed whenever the widget is changed, or whenever the focus leaves an entry.
Tk::Entry, Tk::Label, Tk::Button.
Tk::bind. The bind method can be used to connect
keyboard or mouse event to widget specific actions.

use Tk;

my $winMain = MainWindow->new();
my $prob = 0.5;
$winMain->Scale(
   -label     => 'Probability',
   -orient    => 'horizontal',
   -from      => 0.0,
   -to        => 1.00,
   -digits    => 3,
   -resolution => 0.05,
   -tickinterval => 0.2,
   -showvalue => 'yes',
   -length    => '4i',
   -variable  => \$prob,
   -command => sub{ print "Value: $prob\n"; }
)->pack( -side => 'left' );

MainLoop();
The -to and -from options define the range. -digits and -resolution are used to control precision and increments, respectively.
The optical representation of the scale is spelled out with the -orientiation option, the -tickinterval option for labelling values along the scale, -showvalue (set to 'yes') for enabling a textual display of the current value and, finally,
The Perl code defined via the -command option is - by definition - invoked whenever the selected value changes, but experience shows that this happens more frequently, e.g. when the widget is activated. Use this option with consideration.
Tk::Scale.

use Tk;

my $winMain = MainWindow->new();
my $txtComm = $winMain->Text(
   -height =>  5,
   -width  => 40,
   -wrap   => 'word',
);
$txtComm->pack( -side => 'top' );
$winMain->Button(
   -text    => 'Show',
   -command => sub{ print "Comment:\n", $txtComm->get( '1.0', 'end' ) }
)->pack( -side => 'top' );

MainLoop();
The text widget does not cater for a variable tied to the widget's contents. Therefore you'll have to use the widget method get to access text entered by the user.
As with the entry widget (and, again, contrary to some other widgets) the text widget does not provide for the definition of some command to be executed whenever the widget is changed, or whenever the focus leaves a text.
Tk::Text.
Tk::bind: The bind method can be used to connect
keyboard or mouse event on a text widget to widget specific actions.
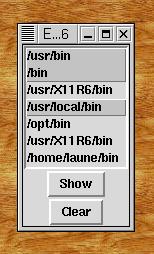
use Tk;

my $winMain = MainWindow->new();
my $boxPath = $winMain->Listbox(
   -height     =>  0,
   -width      =>  0,
   -selectmode => 'multiple'
);
$boxPath->pack( -side => 'top' );
$winMain->Button(
   -text    => 'Show',
   -command => sub{ my @inds = $boxPath->curselection();
                    my @sels;
                    foreach my $i ( @inds ){
                      print $boxPath->get( $i ), "\n";
                    }
                  }
)->pack( -side => 'top' );
$winMain->Button(
   -text    => 'Clear',
   -command => 'sub { $boxPath->selectionClear( 0, 'end' ); }
)->pack( -side => 'top' );

my @paths = split( /:/, $ENV{PATH} );
$boxPath->insert( 'end', @paths );

MainLoop();
The value of the -selectmode option determines how selection may be performed:
The command tied to the button labelled "Show" demonstrates the two-step technique for retrieving a selection set: First the curselection method is used to get the index values corresponding to the selections, and then these index values are passed to get to retrieve the actual list values. (This avoids the necessity of keeping track of the current status of the list, which may grow or shrink dynamically.)
The button labelled "Clear" is provided as a convenience for deselecting all entries in multiple mode, or the (only) selection in single or extended mode, with a single action.
Tk::Listbox, Tk::Button.
Although the range of basic features is small, their combination into simple and cascaded and even multi-column menu structures requires some technical versatility. This section provides the essential know-how. (A good menu design, however, is beyond the scope of this document.)
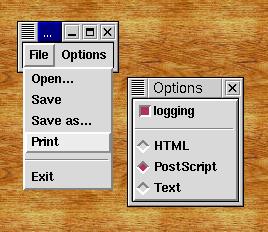
use Tk;

my %opt = ( logging => 0, format => 'Text' );
my $winMain = MainWindow->new();
my $frmMenu = $winMain->Frame()->pack();

# the File menu
#
my $mbtFile = $frmMenu->Menubutton( -text => 'File' );
$mbtFile->pack( -side => 'left' );

my $menFile = $mbtFile->Menu( -tearoff => 'no' );
$menFile->command(
  -label   => 'Open...',
  -command => sub { print "Open...\n"; },
);
$menFile->command(
  -label   => 'Save',
  -command => sub { print "Save\n"; },
);
$menFile->command(
  -label   => 'Save as...',
  -command => sub { print "Save as...\n"; },
);
$menFile->command(
  -label   => 'Print',
  -command => sub { print "Print: $opt{logging} $opt{format}\n"; },
);
$menFile->separator();
$menFile->command(
  -label   => 'Exit',
  -command => sub { exit( 0 ); },
);
$mbtFile->configure( -menu => $menFile );

# the Options menu
#
my $mbtOpts = $frmMenu->Menubutton( -text => 'Options' );
$mbtOpts->pack( -side => 'left' );

my $menOpts = $mbtOpts->Menu( -tearoff => 'yes' );
$menOpts->checkbutton(
  -label    => 'logging',
  -variable => \$opt{logging}
);
$menOpts->separator();
$menOpts->radiobutton(
  -label    => 'HTML',
  -value    => 'HTML',
  -variable => \$opt{format}
);
$menOpts->radiobutton(
  -label    => 'PostScript',
  -value    => 'PostScript',
  -variable => \$opt{format}
);
$menOpts->radiobutton(
  -label    => 'Text',
  -value    => 'Text',
  -variable => \$opt{format}
);

$mbtOpts->configure( -menu => $menOpts );

MainLoop();
A menu is created as a child of its menubutton, augmented with entries such as commands, separators, checkboxes and radiobuttons, and finally tied to its parent menubutton by invoking the menubutton method configure with the -menu option.
Usually a menu is unposted as soon as the user has selected an entry. It may, however, be more convenient for the user to have a menu remain accessible for repeated interaction. This is achieved by defining the -tearoff option with a 'yes' (true) value, resulting in a tearoff entry, a dashed line at the top of the menu. Activating this entry creates a top level window with its own frame which remains visible and operative until it is destroyed.
Tk::Menubutton, Tk::Menu.
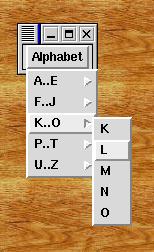
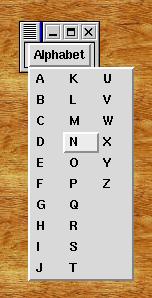
use Tk;

my $winMain = MainWindow->new();
my $frmMenu = $winMain->Frame()->pack();

my $mbtIndx = $frmMenu->Menubutton( -text => 'Alphabet' );
$mbtIndx->pack( -side => 'left' );

my $menIndx = $mbtIndx->Menu( -tearoff => 'no' );
my @ranges = ( [ 'A', 'E' ], [ 'F', 'J' ], [ 'K', 'O' ],
               [ 'P', 'T' ], [ 'U', 'Z' ] );
for my $range ( @ranges ){
  my $menLett = $menIndx->Menu( -tearoff => 'no' );
  for my $letter ( $$range[0]..$$range[1] ){
    $menLett->command(
      -label   => $letter,
      -command => sub { print "@$range -- $letter\n" }
    );
  }
  my $menRang = $menIndx->cascade(
    -label => "$$range[0]..$$range[1]",
    -menu  => $menLett
  );
}
$mbtIndx->configure( -menu => $menIndx );

MainLoop();
Menubutton - Menu - Menu
Long menus of uniform entries can also be arranged in columns, appearing all at once when the menu is selected.
my $mbtIndx = $frmMenu->Menubutton( -text => 'Alphabet' );
$mbtIndx->pack( -side => 'left' );

my $menIndx = $mbtIndx->Menu( -tearoff => 'no' );
my $ient = 0;
for my $letter ( 'A'..'Z' ){
  $menIndx->command(
    -label       => $letter,
    -columnbreak => $ient++ % 10 == 0,
    -command     => sub { print "$letter\n" }
  );
}
$mbtIndx->configure( -menu => $menIndx );
Tk::Menubutton, Tk::Menu.
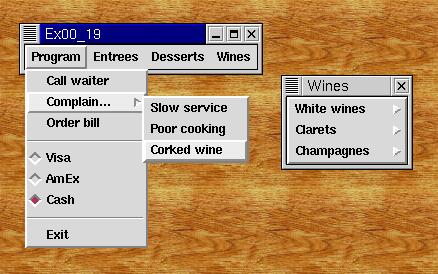
use Tk;

my $winMain = MainWindow->new();
my $frmMenu = $winMain->Frame()->pack();

sub order($){
  print "order: $_[0]\n";
}

sub complain($){
  print "complain: $_[0]\n";
}

my( @wWine, @rWine, @Champ ) = ( (), (), () );
my $payment = 'Cash';
my $mbtPro = $frmMenu->Menubutton(
  -text => 'Program',
  -tearoff => 'no',
  -menuitems => [
    [ 'command', 'Call waiter', -command => sub { print "Waiter!\n" } ],
    [ 'cascade', 'Complain...', -tearoff => 'no',
      -menuitems => [
        [ 'command', 'Slow service', -command => [ \&complain, 'slow' ] ],
        [ 'command', 'Poor cooking', -command => [ \&complain, 'cook' ] ],
        [ 'command', 'Corked wine',  -command => [ \&complain, 'cork' ] ],
      ],
    ],
    [ 'command', 'Order bill',  -command => sub { print '$$$'."\n"; } ],
    [ 'separator', '' ],
    [ 'radiobutton', 'Visa', -value => 'Visa', -variable => \$payment ],
    [ 'radiobutton', 'AmEx', -value => 'AmEx', -variable => \$payment ],
    [ 'radiobutton', 'Cash', -value => 'Cash', -variable => \$payment ],
    [ 'separator', '' ],
    [ 'command', 'Exit',        -command => sub { exit(0) } ],
  ]
);
$mbtPro->pack( -side => 'left' );

my $mbtEnt = $frmMenu->Menubutton(
  -text => 'Entrees',
  -tearoff => 'no',
  -menuitems => [
    [ 'command', 'Artichokes',  -command => [ \&order, 'Art' ] ],
    [ 'command', 'Asparagus',   -command => [ \&order, 'Asp' ] ],
    [ 'command', 'Bay Oysters', -command => [ \&order, 'Oys' ] ],
  ]
);
$mbtEnt->pack( -side => 'left' );

my $mbtDes = $frmMenu->Menubutton(
  -text => 'Desserts',
  -tearoff => 'no',
  -menuitems => [
    [ 'command', 'Peach Melba',     -command => [ \&order, 'Mel' ] ],
    [ 'command', 'Crepes Suzettes', -command => [ \&order, 'Suz' ] ],
  ]
);
$mbtDes->pack( -side => 'left' );

my $mbtWin = $frmMenu->Menubutton(
  -text => 'Wines',
  -tearoff => 'yes',
  -menuitems => [
    [ 'cascade', 'White wines', -menuitems => \@wWine ],
    [ 'cascade', 'Clarets',     -menuitems => \@rWine ],
    [ 'cascade', 'Champagnes',  -menuitems => \@Champ ],
  ]
);
$mbtWin->pack( -side => 'left' );

MainLoop();
[ type, label, ?-option => value,...? ]While type selects the kind of menu entry, the label value corresponds to the -label option of some method for adding a menu entry. Other options from these methods follow in the usual tagged style.
Note that the -tearoff option - actually belonging to the menu widget - may be specified when the menubutton is created and also along with a cascade entry definition in a -menuitems table.
Other menu options would have to be set after the creation of the menu widget hierarchy: Use the cget method to obtain the menu widget object reference from the menubutton object; then call the configure method to set the menu option. An example:
my $mbtMen = $mbtWin->cget( -menu );
$mbtMen->configure( -activeforeground => 'red' );
Tk::Menubutton, Tk::pack.
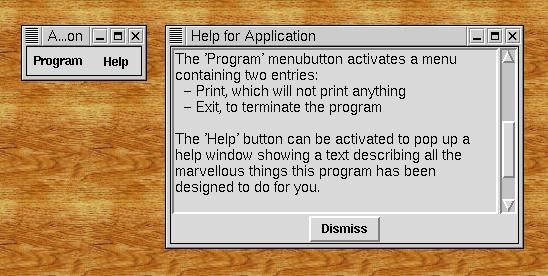
use Tk;

my $hFont = '-*-Helvetica-Medium-R-Normal--*-140-*-*-*-*-*-*',
my $winMain = MainWindow->new();
$winMain->title( 'Application' );
my $frmMenu = $winMain->Frame()->pack();

$frmMenu->Menubutton(
  -text => 'Program',
  -tearoff => 'no',
  -menuitems => [
    [ 'command', 'Print', -command => sub { }         ],
    [ 'command', 'Exit',  -command => sub { exit(0) } ],
  ]
)->pack( -side => 'left' );

$frmMenu->Button(
  -text    => 'Help',
  -relief  => 'flat',
  -command => [ \&doHelp ],
)->pack( -side => 'right' );

# loadText( $widget, $path )
#   load the text $widget with the text on file $path
#
sub loadText($$){
  my( $txtWid, $path ) = @_;
  open( TXT, $path ) || die( "$0: cannot open $path\n" );
  my @text = ;
  close( TXT );
  $txtWid->insert( 'end', join( '', @text ) );
}

# doHelp
#   provide the Help function
#
my $winHelp;
sub doHelp(){
  if( Exists( $winHelp ) ){
    $winHelp->deiconify();
  } else {
    $winHelp = $winMain->Toplevel();
    $winHelp->title( 'Help for Application' );
    my $txtHelp = $winHelp->Scrolled( 'ROText',
      -width  => 40,
      -height => 10,
      -font   => $hFont,
      -wrap   => 'word',
      -scrollbars  => 're',
    );
    $txtHelp->pack( -expand => 'yes', -fill => 'both' );
    $winHelp->Button(
      -text    => 'Dismiss',
      -command => sub { $winHelp->destroy() },
    )->pack();

    loadText( $txtHelp, 'apphelp.txt' );
  }
}

MainLoop();
The obvious choice for the mainstay of the help window is a Text widget. We note, however, that Perl/Tk also provides a ROText class, where "RO" is short for "read only". Using ROText inhibits changes of the displayed text by the user while still permitting modifications by the controlling program. (This is easier than blocking user modification by configuring the Text widget's state to disabled.)
The read-only text widget is created within the help window, using the Perl/Tk constructor Scrolled. This takes care of a number of details:
In addition to the options of the contained widget, a Scrolled widget also accepts the -scrollbars option. Its string value determines which of the four possible scrollbars are provided, and when a scrollbar is actually shown:
The -font option specifies the font to be used for displaying text. Font names are complex beasts containing no less than 14 components, but, luckily, many of these fields may be specified using a wildcard (*). Thus, the font name used in this example:
-*-Helvetica-Medium-R-Normal--*-140-*-*-*-*-*-*requests a medium weight font, normal (not slanted), Helvetica style, in a size of 14 points.
One point that has to be taken into account when displaying some text in a window is the potential mismatch of the window's width and the lengths of the text lines.
The insert method adds text to the contents of a text widget. Its first argument is a position, with 'end' conveniently denoting the end of the current text.
By default, a text widget would be in the 'normal' state, permitting the user to change it at will, using the provided key and mouse bindings. Therefore, after inserting the text, we use configure to set the -state option to 'disabled'.
Tk::Menubutton, Tk::Button,
Tk::Toplevel, Tk::Scrolled,
Tk::ROText.
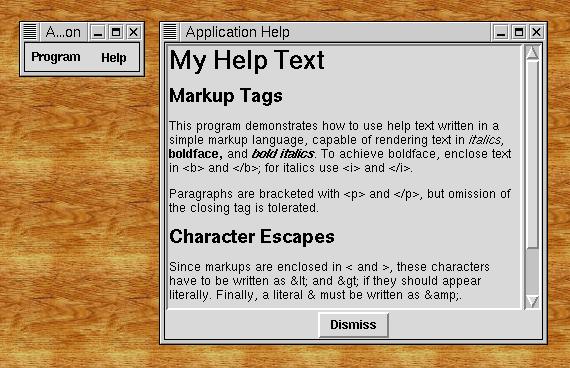
use Tk;

use DisText();

use vars qw{ $winMain $disHelp };

$winMain = MainWindow->new();
$winMain->title( 'Application' );
my $frmMenu = $winMain->Frame()->pack();

$frmMenu->Menubutton(
  -text => 'Program',
  -menuitems => [
    [ 'command', 'Exit',  -command => sub { exit(0) } ],
  ]
)->pack( -side => 'left' );

$frmMenu->Button(
  -text    => 'Help',
  -relief  => 'flat',
  -command => [ \&doHelp ],
)->pack( -side => 'right' );


# doHelp
#   provide the Help function
#
sub doHelp(){
  if( defined( $disHelp ) ){
    $disHelp->show();
  } else {
    $disHelp = DisText->create( $winMain, 'Application Help' );
    $disHelp->load( 'taghelp.txt' );
  }
}

MainLoop();
The package DisText:
package DisText;

use strict;
use Tk;
use Tk::ROText;

use vars qw( $FontPat @Weights @Slants @Sizes $maxHL $tSize );

$FontPat = '-*-Helvetica-%s-%s-Normal--%d-*-*-*-*-*-*-*';
@Weights = qw{ Medium Bold };
@Slants  = qw{ R O };
@Sizes = ( 8, 10, 12, 14, 18, 24 );
$maxHL = 3;
$tSize = 2;

sub create($$$){
  my( $class, $winMain, $title ) = @_;
  my $winHelp = $winMain->Toplevel();
  $winHelp->title( $title );
  my $txtHelp = $winHelp->Scrolled( 'ROText',
    -width  => 50,
    -height => 10,
    -font     => sprintf( $FontPat,
                          $Weights[0], $Slants[0], $Sizes[$tSize] ),
    -spacing3 => $Sizes[$tSize],
    -wrap   => 'word',
    -scrollbars  => 're',
  );
  tagConfig( $txtHelp );
  $txtHelp->pack( -expand => 'yes', -fill => 'both' );
  $winHelp->Button(
    -text    => 'Dismiss',
    -command => sub { $winHelp->destroy() },
  )->pack();

  bless( { toplevel => $winHelp, text => $txtHelp }, $class );
}

sub show($){
  my $self = shift();
  if( Exists( $self->{toplevel} ) ){
    $self->{toplevel}->deiconify();
  } else {
    die( "internal error - no toplevel" );
  }
}

# load( $widget, $path )
#   load the text $widget with the text on file $path
#
sub load($$){
  my( $self, $path ) = @_;
  my $txtWid = $self->{text};
  $txtWid->delete( '1.0', 'end' );

  open( TXT, $path ) || die( "$0: cannot open $path\n" );
  my ( $weight, $slant, $size ) = ( 0, 0, 0 );
  my $text = '';
  while( defined( my $line =  ) ){
    chomp( $line );
    $text .= ' ' if length( $text );
    while( length( $line ) ){
      if( $line =~ s/^([^<]+)// ){
        $text .= $1;
      } elsif( $line =~ s{^<(/?)(\w+)>}{} ){
	my( $off, $tag ) = ( $1, lc($2) );
        ( $weight, $slant, $size ) =
           change( $txtWid, \$text, $off, $tag,
                   $weight, $slant, $size );
      } else {
        print STDERR 'bad markup: '.substr( $line, 0, 10 )."...\n";
        $text .= '<';
        $line =~ s/^tagConfigure(
          "$w:$s:$l",
          -font => sprintf( $FontPat,
                            $Weights[$w], $Slants[$s], $pts ),
          -spacing3 => $Sizes[$tSize],
        );
      }
    }
  }
}

sub emit($$$){
  my( $txtWid, $txtref, $style ) = @_;
  return if length( $$txtref ) == 0;
  my $oldend = $txtWid->index( 'end - 1 chars' );
  $$txtref =~ s/>/>/g;
  $$txtref =~ s/</insert( 'end', $$txtref );
  $$txtref = '';

  if( $style ne '0:0:0' ){
    $txtWid->tagAdd( $style, $oldend, 'end - 1 chars' );
  }
}

sub change($$$$$$$){
  my( $txtWid, $txtref, $off, $tag,
      $weight, $slant, $size ) = @_;
  if( $tag eq 'b' ){
    emit( $txtWid, $txtref, "$weight:$slant:$size" );
    $weight = $off ? 0 : 1;
  } elsif( $tag eq 'i' ){
    emit( $txtWid, $txtref, "$weight:$slant:$size" );
    $slant = $off ? 0 : 1;
  } elsif( $tag eq 'p' ){
    $$txtref .= "\n" if $off || length( $$txtref );
    emit( $txtWid, $txtref, "$weight:$slant:$size" );
    $size = 0;
  } elsif( $tag =~ /h([1-$maxHL])/ ){
    $$txtref .= "\n" if length( $$txtref );
    emit( $txtWid, $txtref, "$weight:$slant:$size" );
    if( $off ){
      $size = 0;
      $weight = $slant = 0;
    } else {
      $size = $maxHL + 1 - $1;
      $weight = 1;
    }
  } else {
    $$txtref .= "<$tag>";
  }
  return( $weight, $slant, $size );
}

1;
Because you want to use normal and boldface, roman and italic type, and a range of point sizes, you select a font family that has a sufficient number of fonts available. From the system's list of available fonts you learn that you have a 10 point font in four different styles:
   -adobe-helvetica-medium-r-normal--10-100-75-75-p-56-iso8859-1
   -adobe-helvetica-medium-o-normal--10-100-75-75-p-57-iso8859-1
   -adobe-helvetica-bold-r-normal--10-100-75-75-p-60-iso8859-1
   -adobe-helvetica-bold-o-normal--10-100-75-75-p-60-iso8859-1
r indicates roman, o signifies italics. medium and bold denote differing weights. These four styles are also available in several other point sizes: 8, 12, 14, 18, and 24. We'll use the 12 point font for plain text. Headers should be displayed in some larger boldface type, header level 1 meriting the largest.
A simple way of associating these attributes with a text is by means of a markup language. We can borrow the markup syntax from HTML, where some text is enclosed in an opening tag (<tag>) and a closing tag (</tag>), with tag denoting some structural or stylistic text property. To keep things simple, we restrict ourselves to three header levels (tags h1, h2 and h3), paragraphs (p), and the boldface (b) and italic (i) text styles.
The package DisText implements a simple class. The constructor create returns an object where references to the toplevel window and its text widget are stored. Method show deiconifies an already existing help window. Method load is provided for loading a text into the help window's text widget. While reading the help text, markup tags are processed, and plain text is added to the text widget. Text that should be represented with a set of attributes differing from the standard set is associated with a tag representing this attribute set.
Since weight, slant and text size define the properties of our text ranges, we'll simply compose the names for our text widget tags from these attributes. Storing the appropriate portion of the font name in arrays @Weights, @Slants and @Sizes, we can represent some attribute selection by joining the corresponding array indices: '1:0:3' is boldface, roman, largest font.
Tk::Menubutton, Tk::Button,
Tk::Toplevel, Tk::Scrolled,
Tk::ROText.
package KeySelection;

use strict;
use Tk::BrowseEntry;

my @xi = (
  [ 'cbxfbck.xbm', 'home' ], [ 'cbxback.xbm', 'prev' ],
  [ 'cbxforw.xbm', 'succ' ], [ 'cbxffwd.xbm', 'end'  ] );
my %wid2obj;

# create( parent, label, command[, keylist[, setkey]] )
#   constructor
#
sub create($$$;$$){
  my( $class, $frame, $label, $command, $keylist, $setkey ) = @_;
  my $obj = { -frame    => $frame,
              -variable => undef(),
              -key2pos  => {},
              -keylist  => [],
              -command  => $command, };
  bless( $obj, $class );

  $obj->{-brentry} = $frame->BrowseEntry(
    -label     => "$label",
    -variable  => \$obj->{-variable},
    -width     => 1,
    -state     => 'normal',
    -browsecmd => \&selectEntry );
  $obj->{-brentry}->pack( -side => 'left' );
  $obj->{-brentry}->bind( '', \&enterKey );

  for my $ar ( @xi ){
      my( $file, $posi ) = @$ar;
      my $path = WinUtil::findINC( $file );
      my $w = $frame->Button(
        -bitmap => '@' . $path,
        -command => [ \&navigate, $obj, $posi ],
      );
      $w->pack( -side => 'left' );
  }

  $obj->setKeylist( $keylist, $setkey ) if defined( $keylist );

  $wid2obj{$obj->{-brentry}} = $obj;
  return $obj;
}

# selectEntry( widget, value )
#   callback when a BrowseEntry value is selected from the list
#
sub selectEntry($$){
    my( $widget, $key ) = @_;
    my $obj = $wid2obj{$widget};
    &{$obj->{-command}}( $obj, $key, $obj->{-key2pos}->{$key} );
}

# enterKey( widget )
#   callback when Enter is pressed in the Entry
#
sub enterKey($){
    my( $entry ) = @_;
    my $widget = $entry->parent()->parent();
    my $obj = $wid2obj{$widget};
    my $key = $obj->{-variable};
    &{$obj->{-command}}( $obj, $key, $obj->{-key2pos}->{$key} );
}

# keySelectionObject->selected( [key] )
#    get/set current key
#
sub selected($;$){
    my( $self, $key ) = @_;
    if( defined( $key ) ){
        return unless exists( $self->{-key2pos}->{$key} );
        return $self->{-variable} = $key
    } else {
        return $self->{-variable};
    }
}

# keySelectionObject->setKeylist( keylist, [current] )
#    get/set current key
#
sub setKeylist($$;$){
    my( $self, $keylist, $setkey ) = @_;
    my $maxlen = 0;
    my $h = {};
    my $pos = 0;
    for my $key ( @$keylist ){
        $h->{$key} = $pos++;
        $maxlen = length( $key ) if length( $key ) > $maxlen;
    }
    if( ! defined( $setkey ) && defined( $self->{-variable} ) ){
        $setkey = $self->{-variable};
        if( ! exists( $h->{$setkey} ) ){
            my $pos = $self->{-key2pos}->{$setkey};
            if( $pos < @$keylist ){
                $setkey = $keylist->[$pos];
            } elsif( @$keylist ){
                $setkey = $keylist->[-1];
            } else {
                $setkey = undef();
            }
        }
    }
    $self->{-key2pos} = $h;
    $self->{-keylist} = $keylist;
    $self->{-brentry}->configure(
      -width     => $maxlen,
      -choices   => $keylist );

    if( defined( $setkey ) ){
        $self->selected( $setkey );
    } else {
        $self->{-variable} = '';
    }
}


# keySelectionObject->navigate( where )
#    set selection to home/end/prev/next position in key list
#
sub navigate($$){
    my( $self, $where ) = @_;
    my $key = $self->selected();
    my $pos;
    if(      $where eq 'end' ){
	$pos = $#{$self->{-keylist}};
    } elsif( $where eq 'succ' ){
        return unless defined( $key ) &&
               exists( $self->{-key2pos}->{$key} );
        $pos = $self->{-key2pos}->{$key} + 1;
        $pos = $#{$self->{-keylist}}
          if $pos > $#{$self->{-keylist}};
    } elsif( $where eq 'prev' ){
        return unless defined( $key ) &&
               exists( $self->{-key2pos}->{$key} );
        $pos = $self->{-key2pos}->{$key} - 1;
        $pos = 0 if $pos < 0;
    } else { # 'home'
        $pos = 0;
    }
    $key = $self->{-keylist}->[$pos];
    $self->{-variable} = $key;
    &{$self->{-command}}( $self, $key, $pos );
}

1;
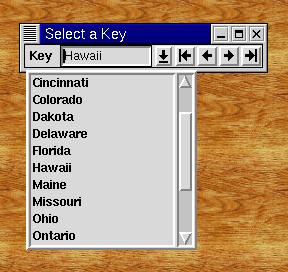
Here is a simple illustration for using this package:
use strict;
use Tk;

use WinUtil;
use KeySelection;

sub gotoKey($$$){
    my( $wid, $key, $pos ) = @_;
    print "Selected key: $key, pos: $pos\n";
}

my $winMain = MainWindow->new();
$winMain->title( 'Select a Key' );

my $frmSel = $winMain->Frame()->pack();

my $states =   [
  'Alabama', 'Alaska', 'California', 'Cincinnati',
  'Dakota', 'Delaware', 'Florida', 'Hawaii', 'Maine',
  'Ohio', 'Ontario', 'Pennsylvania', 'Texas', 'Utah',
  'Vermont', 'Virginia' ];

my $keysel = KeySelection->create(
    $frmSel, 'Key ', \&gotoKey, $states, 'Hawaii' );

MainLoop();
The setKeylist method is provided for modifying the list of key values. Some care must be taken to avoid leaving a value that is not in the list any more in the entry widget. Also, the width of the list box is adjusted after recomputing the maximum key length.
A key can be selected from the list box, by navigating with a button and though entering a value, all resulting in different kinds of callbacks. These differences are hidden from the user by providing a single callback which returns the selected value and its index in the list.
Tk::BrowseEntry.
package ScrolledGrid;

use strict;

#####
# ScrolledGrid( frame, rows, columns, show, create )
#
sub ScrolledGrid {
    my( $class, $frame, $rows, $cols, $show, $create ) = @_;
    my $obj = { -rows => $rows, -cols => $cols,
                -show => $show, -lo => 0, -hi => $show - 1 };
    bless( $obj, 'ScrolledGrid' );
    $obj->{-grid} = $frame->Frame();

    # place all cells
    #
    for( my $r = 0; $r < $rows; $r++ ){
        for( my $c = 0; $c < $cols; $c++ ){
            my( $cell, @opts ) = &{$create}( $obj->{-grid}, $r, $c );
            $obj->{-cell}[$r][$c] = $cell;
            $obj->{-opts}[$r][$c] = \@opts;
            $cell->grid( -row => $r, -column => $c, @opts );
        }
    }
    $obj->{-grid}->update();

    # determine maximum column widths and forget cells in excess rows
    #
    my @maxw = ( 0 ) x $cols;
    for( my $r = 0; $r < $rows; $r++ ){
        for( my $c = 0; $c < $cols; $c++ ){
            $obj->{-cell}[$r][$c]->gridForget() if $r >= $show;
            my( undef, undef, $xdim, $ydim ) =
                $obj->{-grid}->gridBbox( $c, $r );
            $maxw[$c] = $xdim if $xdim > $maxw[$c];
        }
    }

    # freeze comlumn widths
    #
    for( my $c = 0; $c < $cols; $c++ ){
        $obj->{-grid}->gridColumnconfigure( $c,
          -minsize => $maxw[$c], -weight => 0 );
    }
    $obj->{-grid}->pack( -side => 'left' );

    # add scrollbar if necessary
    #
    if( $rows > $show ){
        $obj->{-sbar} = $frame->Scrollbar();
        $obj->{-sbar}->pack( -side => 'right', -fill => 'y' );
        $obj->{-sbar}->configure( -command => [ \&scrollcommand, $obj ] );
        $obj->{-sbar}->set( 0.0, $show/$rows );
    }

    return $obj;
}

sub scrollcommand{
    my( $obj, @cmd ) = @_;
    my $d;
    if( $cmd[0] eq 'moveto' ){
        my $to = int( $cmd[1] * ( $obj->{-rows}-1 ) );
        $d = $to - $obj->{-lo};
    } elsif( $cmd[0] eq 'scroll' ){
        if( $cmd[2] eq 'units' ){
            $d = $cmd[1];
        } else {
            $d = $cmd[1]*($obj->{-show}-1);
        }
    } else {
        die( "bad scroll command" );
    }
    if( $d > 0 ){
        $d = $obj->{-rows}-1 - $obj->{-hi}
          if $obj->{-hi} + $d > $obj->{-rows}-1;
    } else {
        $d = -$obj->{-lo}
          if $obj->{-lo} + $d < 0;
    }
    if( $d > 0 ){
        for( my $i = 1; $i <= $d; $i++ ){
            for( my $c = 0; $c < $obj->{-cols}; $c++ ){
                $obj->{-cell}->[$obj->{-lo}][$c]->gridForget()
                  if defined( $obj->{-cell}->[$obj->{-lo}][$c] );
            }
            $obj->{-lo}++; $obj->{-hi}++;
            for( my $c = 0; $c < $obj->{-cols}; $c++ ){
                $obj->{-cell}->[$obj->{-hi}][$c]->grid(
                  -row => $obj->{-hi}, -column => $c,
                  @{$obj->{-opts}->[$obj->{-hi}][$c]} )
                  if defined( $obj->{-cell}->[$obj->{-hi}][$c] );
            }
        }
    } elsif( $d < 0 ){
        for( my $i = -1; $i >= $d; $i-- ){
            for( my $c = 0; $c < $obj->{-cols}; $c++ ){
                $obj->{-cell}->[$obj->{-hi}][$c]->gridForget()
                  if defined( $obj->{-cell}->[$obj->{-hi}][$c] );
            }
            $obj->{-hi}--; $obj->{-lo}--;
            for( my $c = 0; $c < $obj->{-cols}; $c++ ){
                $obj->{-cell}->[$obj->{-lo}][$c]->grid(
                  -row => $obj->{-lo}, -column => $c,
                  @{$obj->{-opts}->[$obj->{-lo}][$c]} )
                  if defined( $obj->{-cell}->[$obj->{-lo}][$c] );
            }
        }
    }
    $obj->{-sbar}->set( $obj->{-lo}/($obj->{-rows}-1),
                        $obj->{-hi}/($obj->{-rows}-1) ) if $d;
    return $obj;
}
1;
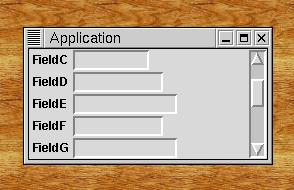
The program below uses ScrolledGrid to set up a scrolled
frame with a list of label-entry widgets:
use strict;
use Tk;

use ScrolledGrid;

my $winMain = MainWindow->new();
$winMain->title( 'Application' );

my @Fields = (
  [ 'FieldA', 10 ],
  [ 'FieldB', 12 ],
  [ 'FieldC', 10 ],
  [ 'FieldD', 12 ],
  [ 'FieldE', 14 ],
  [ 'FieldF', 12 ],
  [ 'FieldG', 14 ],
  [ 'FieldH', 20 ],
  [ 'FieldI', 22 ],
  [ 'FieldJ', 20 ],
  [ 'FieldK', 24 ],
  [ 'FieldL', 20 ],
);

sub makeCell($$$){
    my( $frame, $row, $col ) = @_;
    my $cell;
    if( $row < @Fields ){
        if( $col == 0 ){
            $cell = $frame->Label( -text  => $Fields[$row][0] );
        } elsif( $col == 1 ){
            $cell = $frame->Entry( -width => $Fields[$row][1] );
        }
    }
    return( $cell, -sticky => 'w' );
}

my $frmScrolledGrid = $winMain->Frame()->pack();

ScrolledGrid->ScrolledGrid(
   $frmScrolledGrid, scalar( @Fields ), 2, 5, \&makeCell );

MainLoop();
Another important ingredient for our recipee is the Scrollbar widget's scrollcommand callback propagating user actions on the scrollbar to the program. We may expect scrollcommands expressed as a relative movement (given as a number of units or pages) or as an absolute setting to some fractional position.
Setting up the scrolled grid frame is done in ScrolledGrid, where the given frame is subdivided into a frame for the grid cells and a scrollbar. Cells are obtained through a callback which is passed the frame and a row and a column number. The callback returns the created widget and any options that should be used while placing the widget with the grid methods. After all cells have been created, the update method ensures that all pending construction are performed so that the subsequent loop over all cell widgets will be able to obtain up-to-date geometry values. The important value here is the width of a cell, used for computing the maximum width of all cells for each column. We can then use
gridColumnconfigure( $c, -minsize => $maxw[$c], -weight => 0 );to freeze the width of a column. (Failure to do so has the undesirable effect of changing the gridded frame's dimensions whenever the maximum visible width of a column changes.) Forgetting the cells in all rows exceeding the number of rows that should be visible at one time comletes the setup.
The scrollcommand subroutine is the callback for the scrollbar. The scroll unit is one grid row, and a scroll page is (arbitrarily) defined as a numer of rows: one less than the number of rows that should be visible. The argument of a 'moveto' scrollcommand is converted to a row number. After checking that the new position does not exceed the available row range at either end, we prepare the execution of two loops: one forgets the rows that should disappear, while the other one recreates the rows that should appear at the other end.
Tk::Scrollbar, Tk::grid, Tk::Frame.
A canvas widget handles the representation of a collection of graphic structures, displaying any number of items. An item of a particular type (such as line, polygon, circle or text) is created by calling the appropriate method. Attributes (such as coordinates or colors) of an item can be changed by applying the configure method, and the delete method does what its name implies.
The coordinate system used with the canvas widget is a cartesian coordinate system with the origin at the top left corner of the canvas and x-coordinates inreasing from left to right and y-coordinates from top to bottom. The unit is one pixel, but this makes programs dependant on the quality of a screen device. Therefore coordinates may be specified in inches, centimeters, millimeters, or printer's points by attaching the initial letter of the desired unit to the coordinate value.
Items are kept in a display list which governs the order in which items are drawn on the screen, with later items potentially obscuring earlier ones. (Methods for rearranging the display list are available.) In addition to graphics objects, also all kind of window widgets can be positioned on a canvas, actually appearing to float above all that goes on at the graphics level.
Since information in the canvas may cover more area than can be shown on a display's screen, scrolling can be set up for a canvas. Whenever scrolling is in use, it is important to remember that there are in fact two coordinate systems: the one for the canvas, to be used in canvas methods, and another one for the window panned over the canvas which is used for communicating events.
x = sin( ω1 t )Here, t is the independent variable, while ω1, ω2 and φ are some constants. Different sets of constants result in different functions, with the corresponding graphs varying to a remarkable degree.
y = sin( ω2 t + φ )
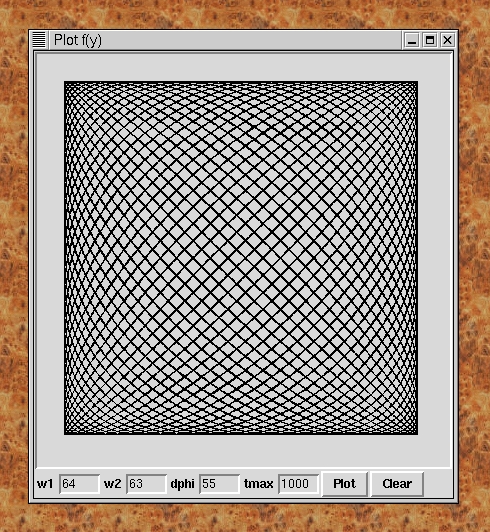
use strict;
use Tk;

my $unit   = 6;
my $margin = 1;

my @cid;

# transform x, y to plot coordinates
#
sub transform($$){
    my( $x, $y ) = @_;
    $x = $unit *($x+1) + $margin;
    $y = $unit *($y+1) + $margin;
    return( $x.'c', $y.'c' );
}

sub doPlot($){
    my( $can, $fref ) = @_;
    my $w1 = $fref->{w1};
    my $w2 = $fref->{w2};
    my $dphi = $fref->{dphi}/180.0*3.14159265358979;
    my $tmax = $fref->{tmax};
    my $h = 0.1;
    my @xy;
    if( $w1 > $w2 ){
        $w2 /= $w1;
        $w1 = 1;
    } else {
        $w1 /= $w2;
        $w2 = 1;
    }
    for( my $t = 0; $t <= $tmax; $t += $h ){
       my $x = sin( $w1*$t );
       my $y = sin( $w2*$t + $dphi );
       push( @xy, transform( $x, $y ) );
    }

    push( @cid, $can->createLine( @xy, -width => 0.5, -smooth => 1 ) );
}

sub doClear($){
    my( $can ) = @_;
    $can->delete( @cid );
    @cid = ();
}

sub setupScreen(){
  my $winMain = MainWindow->new();
  $winMain->title( 'Plot x(t), y(t)' );

  my $frmCan = $winMain->Frame();
  $frmCan->pack(-side => 'top', -fill => 'both', -expand => 'yes');

  my $h = 2*$unit + 2*$margin;
  my $can = $frmCan->Canvas(
    -width        => $h . 'c',
    -height       => $h . 'c',
    -relief       => 'sunken',
    -bd => 2,
  );
  $can->pack(-expand => 'yes', -fill => 'both');

  my $frmFun = $winMain->Frame();
  $frmFun->pack( -side => 'top', -fill => 'both', -expand => 'yes' );

  my %p;
  for my $name ( qw{ w1 w2 dphi tmax } ){
    $frmFun->Label( -text => $name )->pack( -side => 'left' );
    $frmFun->Entry( -width => 5, -textvariable => \$p{$name} )
      ->pack( -side => 'left' );
  }

  $frmFun->Button( -text => 'Plot',
                   -command => [ \&doPlot, $can, \%p ] )
         ->pack( -side => 'left' );
  $frmFun->Button( -text => 'Clear',
                   -command => [ \&doClear, $can ]  )
         ->pack( -side => 'left' );
}

setupScreen();
MainLoop();
my $h = 2*$unit + 2*$margin;
my $can = $frmCan->Canvas(
  -width        => $h . 'c',
  -height       => $h . 'c',
  -relief       => 'sunken',
  -bd => 2,
);
Options -width and -height define the dimensions which we specify in centimeters and depending on the global values $unit and $margin. (The reason for this will be seen when we discuss the mapping of coordinates from our pure geometry world to the canvas area.)
For plotting a line or curve we use the createLine method, applied to a Canvas object, e.g.:
$cid = $can->createLine( @xy, -width => 1, -smooth => 1 );The @xy array contains a list of canvas coordinates, with x- and y- coordinates alternating in a flat list. Option -width with a value of 1 sets the line width to the minimum. Since we want a curve (rather than straight lines) we add option -smooth set to true. All create-something methods of the canvas widget return a canvas id which serves as a handle for referring to the created item. (Note that this is not an object reference.) This is illustrated in subroutine doClear which calls the canvas method delete with a list of canvas ids.
What remains to be seen is how we compute the coordinates. This is done in doPlot, where (after a little juggling with the function parameters) a series of coordinate pairs for increasing values of t are computed. (Note that the choice of 0.1 as an increment for t may not work well for other functions.) It is easy to see that their absolute value never exceeds 1, but simply plotting these values would result in a tiny speck on the screen. The mapping of the "world coordinates" to canvas coordinates is done by transform:
sub transform($$){
    my( $x, $y ) = @_;
    $x = $unit *( $x+1) + $margin;
    $y = $unit *(-$y+1) + $margin;
    return( $x.'c', $y.'c' );
}
This is a simple linear transformation, where we take care of the
fact that y-coordinates increase from canvas top towards canvas
bottom, scale to reasonable size and add a margin for a pleasing
overall impression.
Tk::Canvas, Tk::Button, Tk::Frame.
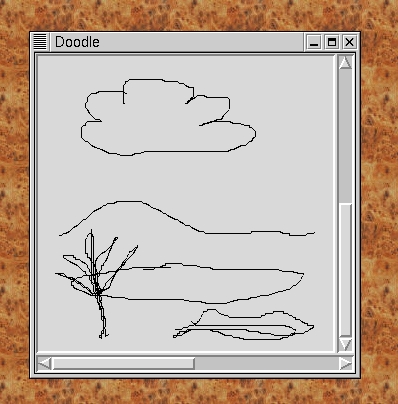
use strict;
use Tk;

my $cursPencil    = [ 'pencil',    'Black', 'Blue' ];
my $cursCrosshair = [ 'crosshair', 'Gold',  'Red'  ];

sub setupScreen(){
  my $winMain = MainWindow->new();
  $winMain->title( 'Doodle' );

  my $frmCan = $winMain->Frame();
  $frmCan->pack(-side => 'top', -fill => 'both', -expand => 'yes');

  my $can = $frmCan->Canvas(
    -scrollregion => [ '0c', '0c', '20c', '20c' ],
    -width        => '10c',
    -height       => '10c',
    -relief       => 'sunken',
    -bd => 2,
    -cursor       => $cursCrosshair
  );
  my $w_frame_vscroll = $frmCan->Scrollbar( -command => [$can => 'yview']);
  my $w_frame_hscroll = $frmCan->Scrollbar(
    -orient => 'horiz',
    -command => [$can => 'xview'],
  );
  $can->configure( -xscrollcommand => [$w_frame_hscroll => 'set'] );
  $can->configure( -yscrollcommand => [$w_frame_vscroll => 'set'] );

  $w_frame_hscroll->pack(-side => 'bottom', -fill => 'x');
  $w_frame_vscroll->pack(-side => 'right', -fill => 'y');
  $can->pack(-expand => 'yes', -fill => 'both');

  $can->Tk::bind( ''   => [ \&StartDraw ] );
  $can->Tk::bind( ''       => [ \&ContDraw ] );
  $can->Tk::bind( '' => [ \&EndDraw ] );
}

my( @xy, $lastX, $lastY, $cid );

sub StartDraw($){
  my $can = shift;
  my $e = $can->XEvent;
  @xy = ();
  ( $xy[0], $xy[1] ) = ( $lastX, $lastY ) =
  ( $can->canvasx( $e->x ), $can->canvasy( $e->y ) );
  $can->configure( -cursor => $cursPencil );
}

sub ContDraw($){
  my $can = shift;
  my $e = $can->XEvent;
  my( $x, $y ) = ( $can->canvasx( $e->x ), $can->canvasy( $e->y ) );
  if( $x != $lastX || $y != $lastY ){
      push( @xy, $x, $y );
      ( $lastX, $lastY ) = ( $x, $y );
      if( @xy == 4 ){
          $cid = $can->createLine( @xy, -fill => 'black', -width => 1.0 );
      } elsif( @xy > 4 ){
          $can->coords( $cid, @xy );
      }
  }
}

sub EndDraw($){
  my $can = shift;
  $can->configure( -cursor => $cursCrosshair );
}

setupScreen();
MainLoop();
Scrolling and moving the crosshair cursor alone don't make things happen on our canvas. Somehow, we'll have to mimick the behavior of a pen: put it down on the plane, move it hither and tither, and lift it off again. This is done by selecting events and binding them to subroutines, like this:
$can->Tk::bind( 'The event that is bound to subroutine StartDraw is mouse button 1 being depressed. StartDraw must now be written to respond to that event:' => [ \&StartDraw ] );
sub StartDraw($){
  my $can = shift;
  my $e = $can->XEvent;
  @xy = ();
  ( $xy[0], $xy[1] ) = ( $lastX, $lastY ) =
  ( $can->canvasx( $e->x ), $can->canvasy( $e->y ) );
  $can->configure( -cursor => $cursPencil );
}
First we note that the widget object that has been used in the bind
call is passed as the first argument to our event handler. Calling method
XEvent with this widget returns an event object which
could now be analyzed with a flourish of functions, but we are satisfied
with obtaining the event coordinates with methods x and y.
Since this move starts a new doodle we register the starting point and
change the appearance of the cursor. Make sure to use canvasx and
canvasy to transform the event coordinates to canvas
coordinates, because X events are not restricted to certain widgets.
What is likely to happen next is some scribbling on our canvas. This is done by moving the mouse (button 1 is still pressed). Due to the binding
$can->Tk::bind( 'subroutine ContDraw is called whenever some movement of the mouse is sensed. This stream of events is handled by obtaining the event coordinates and by starting or extending the line:' => [ \&ContDraw ] );
sub ContDraw($){
  my $can = shift;
  my $e = $can->XEvent;
  my( $x, $y ) = ( $can->canvasx( $e->x ), $can->canvasy( $e->y ) );
  if( $x != $lastX || $y != $lastY ){
      push( @xy, $x, $y );
      ( $lastX, $lastY ) = ( $x, $y );
      if( @xy == 4 ){
          $cid = $can->createLine( @xy, -fill => 'black', -width => 1.0 );
      } elsif( @xy > 4 ){
          $can->coords( $cid, @xy );
      }
  }
}
The canvas method coords is useful for changing the position of
a canvas item without affecting all other attributes. Here we use it to
add the next stroke to our line. Releasing the mouse button is bound to
EndDraw where all we have to do is to change the cursor shape
back to the initial crosshair.
Drawing with this program isn't easy: since every tiny jerk of the mouse is monitored the resulting lines tend to become jittery. Better results are achieved by adding points only after the pen has travelled a little farther than just a single pixel:
if( abs($x - $lastX) > 2 || abs($y - $lastY) > 2 ){
  ... add another point ...
}
Greater increments are bound to disfigure quickly drawn arcs, but this
can be ironed out by applying the -smooth option.
More important is the observation that ever-increasing doodles result in bloated coordinate arrays. You won't run out of memory too soon, but if you're persistent enough even a fast CPU may have problems catching up with your pen. To beat this effect, simply split the current doodle line after a while.
Tk::Canvas, Tk::Frame.
Gerhard Mercator, a Flemish cartographer, published a map of the world where he used the technique that was subsequently named after him. Mercator maps are popular with mariners because loxodromes (or rhumb lines, i.e. lines making equal oblique angles with all meridians) are straight lines: you draw a straight line on the map and sail this course by following a single compass bearing. On longer distances, however, loxodromes deviate quite significantly from great circles which are the globe's geodesic lines, and these are the ones you should follow when you're in a hurry.
We would like to see a Mercator map of the world, with the possibility of displaying the endpoints of some journey and the great circle connecting them.
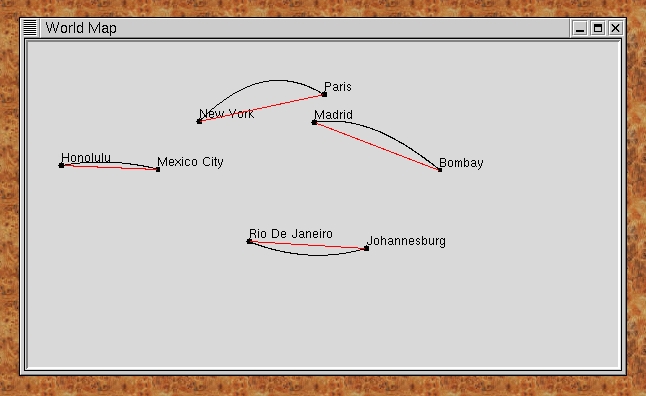
Rendering the projection plane in a canvas widget is now straightforward.
The program has been designed to illustrate the two-stage transformation from the "real world" (the Earth) to some model (the chose projection of the Earth's surface), and on to the canvas.
Tk::Canvas.
package CompObj;

use strict;

our %cid2obj;

# constructor for the base class object
#
sub new($$@){
    my( $class, $can, $x, $y, @cids ) = @_;
    my $obj = { -x => $x, -y => $y,
                -items  => \@cids,
                -canvas => $can };
    bless( $obj, $class );
    for my $cid ( @cids ){
	$cid2obj{$cid} = $obj;
    }
    return $obj;
}

# class method retrieving an object by the canvas id of
# one of its constituents
#
sub getObj($$){
    my( $class, $cid ) = @_;
    return $cid2obj{$cid};
}

# method for moving an object
#
sub move($$$){
    my( $self, $dx, $dy ) = @_;
    my $can = $self->{-canvas};
    for my $cid ( @{$self->{-items}} ){
        $can->move( $cid, $dx, $dy );
    }
}

# method for painting an object
#
sub paint($$){
    my( $self, $colour ) = @_;
    my $can = $self->{-canvas};
    for my $cid ( @{$self->{-items}} ){
        $can->itemconfigure( $cid, -fill => $colour );
    }
}

sub x($){
    return $_[0]->{-x};
}

sub y($){
    return $_[0]->{-y};
}

# subclass for object type "hut"
#
package Hut;

use strict;
our @ISA = qw{ CompObj };

sub new($$$$){
    my( $class, $can, $x, $y ) = @_;
    my $ciSquare = $can->createOval(
      $x-10, $y-10, $x+10, $y+10,
      -fill => 'Red', -outline => undef,
      -tags => 'changes' );
    my $ciTriangle = $can->createPolygon(
      $x-10, $y-10, $x+10, $y-10, $x, $y-20,
      -fill => 'Red', -outline => undef,
      -tags => 'changes' );
    $class->SUPER::new( $can, $x, $y, $ciSquare, $ciTriangle );
}

# subclass for object type "ring"
#
package Ring;

use strict;
our @ISA = qw{ CompObj };

sub new($$$$){
    my( $class, $can, $x, $y ) = @_;
    my $ciOuter = $can->createOval(
      $x-10, $y-10, $x+10, $y+10,
      -fill => 'Red', -outline => undef,
      -tags => 'moves' );
    my $ciInner = $can->createOval(
      $x-5, $y-5, $x+5, $y+5,
      -fill => 'Black', -outline => undef,
      -tags => 'moves' );
    $class->SUPER::new( $can, $y, $y, $ciOuter, $ciInner );
}

1;
The main program creates a canvas and places some objects on it.
use strict;
use Tk;

use CompObj;

my $cursMove  = [ 'fleur', 'Green', 'Black' ];

sub setupScreen(){
  my $winMain = MainWindow->new();
  $winMain->title( 'Interactive' );

  my $frmCan = $winMain->Frame();
  $frmCan->pack(-side => 'top', -fill => 'both', -expand => 'yes');

  my $can = $frmCan->Scrolled( 'Canvas',
    -width        => '10c',
    -height       => '5c',
    -scrollregion => [ 0, 0, '20c', '10c' ],
    -relief       => 'sunken',
    -bd           => 2,
  );
  $can->pack(-expand => 'yes', -fill => 'both');

  # define action for moving
  $can->bind( 'moves', '' => [ \&StartMove, Ev('x'), Ev('y') ] );

  # define menu for changing
  $can->bind( 'changes', '' => [ \&Change, Ev('X'), Ev('Y') ] );

  return $can;
}

# invoke menu for changing an object's appearance
#
sub Change($$$){
    my( $can, $X, $Y ) = @_;

    # are we near some element?
    my $cid = $can->find( 'withtag', 'current' );
    if( defined( $cid ) ){
        my $compobj = CompObj->getObj( $cid );
        my $chgmenu = $can->Menu( -tearoff => 0 );
        $chgmenu->add( 'command', -label => 'Blue',
                       -command => [ \&CompObj::paint, $compobj, 'Blue' ] );
        $chgmenu->add( 'command', -label => 'Green',
                       -command => [ \&CompObj::paint, $compobj, 'Green' ] );
        $chgmenu->add( 'command', -label => 'Red',
                       -command => [ \&CompObj::paint, $compobj, 'Red' ] );
        my( $px, $py ) = ( $can->rootx() + $compobj->x() - $can->canvasx( 0 ),
                           $can->rooty() + $compobj->y() - $can->canvasy( 0 ) );
        $chgmenu->Post( $px, $py ); # or $X, $Y
    }
}

# menu and actions for moving an element
#
my( $oldCurs, $lastX, $lastY, $compObj );

sub StartMove($$$){
  my( $can, $x, $y ) = @_;
  # are we near some element?
  my $cid = $can->find( 'withtag', 'current' );
  if( defined( $cid ) ){
    ( $lastX, $lastY ) = ( $x, $y );
    $compObj = CompObj->getObj( $cid );
    $oldCurs = $can->cget( -cursor );
    $can->configure( -cursor => $cursMove );
    $can->bind( 'current', '' => [ \&ContMove, Ev('x'), Ev('y') ] );
    $can->bind( 'current', '' => \&EndMove );
  }
}

sub ContMove($$$){
  my( $can, $x, $y ) = @_;
  $compObj->move( $x - $lastX, $y - $lastY );
  ( $lastX, $lastY ) = ( $x, $y );
}

sub EndMove($){
  my( $can ) = @_;
  $can->configure( -cursor => $oldCurs );
  $can->bind( 'current', ''       => undef() );
  $can->bind( 'current', '' => undef() );
}

# main program: screen setup, main loop
#
my $can = setupScreen();
Hut->new( $can, 130, 130 );
Ring->new( $can, 60, 30 );

MainLoop();
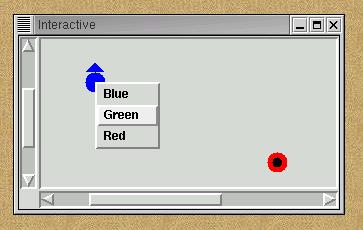
Interaction in connection with graphics objects represented by a group of canvas items requires you to solve a number of technical problems:
Associating events with actions is done with the bind method. The object is the Canvas widget, so the canvas item has to be identified by an argument of the method. One way would be to specify the canvas identifier, but this would require one or more bind calls after creating the canvas item. The preferred method is to label a specific property with a tag, to bind the event to the tag and to attach tags to canvas items when they are created. Our program features two tags, represented as non-numeric strings ('moves' and 'changes'). The first argument to the callback will be the object used for defining the callback. Additional elements can be specified by placing them in a reference to an anonymous array. This technique permits the inclusion of calls to Ev, a particular "constructor", which will be replaced by the property of the event indicated by its character argument before the callback is invoked. In our example we use Ev with the arguments 'x' and 'y' returning the event coordinates relative to the widget origin, and with 'X' and 'Y' yielding the coordinates relative to the root window.
Finding the corresponding canvas item is usually simply achieved by invoking the Canvas method find like this:
$can->find( 'withtag', 'current' );The tag 'current' is automatically maintained by Perl/Tk.
To associate a canvas item with the composite object it belongs to, we could store the object reference in an array, indexed by the canvas id. This is fastest for lookup, but it has the disadvantage that deleted canvas items continue to occupy an index position. (Canvas ids just keep growing.) Package CompObj demonstrates using a hash which permits the deletion of entries for deleted items.
Using the object reference we can call methods for moving or reconfiguring all items of the object. (It should be noted that, although itemconfigure can be applied to all canvas items, its options vary with respect to item types. Similar methods might have to check the item type before doing reconfiguration, which could be done by retrieving the item type by calling the type method with a canvas id.)
Moving a graphics object can be done by selecting the "move" operation and then either by dragging the object to its destination or by simply clicking at the new destination. Dragging a large number of canvas items at the same time may be a performance issue, but the method is preferred by most users. Dragging is implemented by binding the currnt item, the event pattern <B1-Motion> and a subroutine registering the event position and adjusting the item's position accordingly.
Calling up a menu requires explicit posting of a menu, which is a toplevel window. (Usually this is done implicitly whenever a menu button is pressed.) The Post method requires root window coordinates, which must not be confused with coordinates relative to a widget, nor with canvas coordinates. To post the menu at a position depending on that of the graphics object, retrieve the coordinates of the upper-left corner of the canvas and add the object position, but don't forget to compensate for the off-scrolled part of the canvas:
my( $px, $py ) = ( $can->rootx() + $compobj->x() - $can->canvasx( 0 ),
                   $can->rooty() + $compobj->y() - $can->canvasy( 0 ) );
Methods canvasx and canvasx return the canvas coordinate
of the given window coordinate. Since (0, 0) is the upper left corner of
the window, it tells us how much is scrolled off to the left or top,
respectively.
Alternatively, the menu could simply be placed at the cursor position. These coordinates are available as fields X, Y (in uppercase) from the event.
A final hint: Whenever your program computes canvas coordinates from screen coordinates or vice versa, make sure to test the results with the canvas being scrolled away from the home position.
Tk::Canvas, Tk::Scrolled, Tk::Menu.
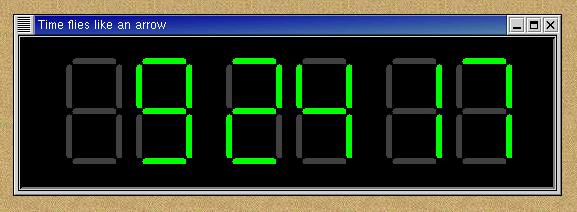
package SevenSegment;

sub new($$$$$$;$){
    my( $class, $can, $x, $y, $b, $w, $oncol  ) = @_;
    $oncol ||= 'Green';
    my @cids;
    $cids[0] = $can->createLine(
       $x+$w, $y, $x+$b-$w, $y,
       -capstyle => 'round', -width => $w, -fill => 'Gray25' );
    $cids[1] = $can->createLine(
       $x, $y+$w, $x, $y+$b-$w,
       -capstyle => 'round', -width => $w, -fill => 'Gray25' );
    $cids[2] = $can->createLine(
       $x+$b, $y+$w, $x+$b, $y+$b-$w,
       -capstyle => 'round', -width => $w, -fill => 'Gray25' );
    $cids[3] = $can->createLine(
       $x+$w, $y+$b, $x+$b-$w, $y+$b,
       -capstyle => 'round', -width => $w, -fill => 'Gray25' );
    $cids[4] = $can->createLine(
       $x, $y+$b+$w, $x, $y+2*$b-$w,
       -capstyle => 'round', -width => $w, -fill => 'Gray25' );
    $cids[5] = $can->createLine(
       $x+$b, $y+$b+$w, $x+$b, $y+2*$b-$w,
       -capstyle => 'round', -width => $w, -fill => 'Gray25' );
    $cids[6] = $can->createLine(
       $x+$w, $y+2*$b, $x+$b-$w, $y+2*$b,
       -capstyle => 'round', -width => $w, -fill => 'Gray25' );

    my $obj = { -canvas => $can,
                -x => $x, -y => $y,
                -segments => \@cids,
                -oncol    => $oncol };
    bless( $obj, $class );
}

my %dtab = (
  ' ' => [ ],
  '0' => [ 0, 1, 2, 4, 5, 6 ],
  '1' => [ 2, 5 ],
  '2' => [ 0, 2, 3, 4, 6 ],
  '3' => [ 0, 2, 3, 5, 6 ],
  '4' => [ 1, 2, 3, 5 ],
  '5' => [ 0, 1, 3, 5, 6 ],
  '6' => [ 0, 1, 3, 4, 5, 6 ],
  '7' => [ 0, 2, 5 ],
  '8' => [ 0, 1, 2, 3, 4, 5, 6 ],
  '9' => [ 0, 1, 2, 3, 5, 6 ],
	    );

sub show($$){
    my( $self, $char ) = @_;
    my @on = ( ( 0 ) x 7 );
    for my $seg ( @{$dtab{$char}} ){
        $on[$seg] = 1;
    }

    for( my $iseg = 0; $iseg < 7; $iseg++ ){
        $self->{-canvas}->itemconfigure(
          $self->{-segments}[$iseg],
	  -fill => $on[$iseg] ? $self->{-oncol} : 'Gray25' );
    }
}

sub colour($$){
    my( $self, $oncol ) = @_;
    $self->{-oncol} = $oncol;
}

1;
The main program performs the screen setup, creates 6 digit objects and
launches processing.
use Tk;

use SevenSegment;

our @digits;

sub dispTime($){
  my( $digref ) = @_;
  use integer;
  my( $sec, $min, $hour ) = localtime( time() );
1  $digref->[0]->show( $hour/10 || ' ' );
  $digref->[1]->show( $hour%10 );
  $digref->[2]->show( $min/10 || ' ' );
  $digref->[3]->show( $min%10 );
  $digref->[4]->show( $sec/10 || ' ' );
  $digref->[5]->show( $sec%10 );
}

sub alertTime($){
  my( $digref ) = @_;
  for my $dig ( @$digref ){
    $dig->colour( 'Red' );
  }
}

sub setupScreen(){
  my $winMain = MainWindow->new();
  $winMain->title( 'Time flies like an arrow' );

  my $frmCan = $winMain->Frame();
  $frmCan->pack(-side => 'top', -fill => 'both', -expand => 'yes');

  my $can = $frmCan->Canvas(
    -width        => '18c',
    -height       => '5c',
    -relief       => 'sunken',
    -bd           => 2,
    -background   => 'Black',
  );
  $can->pack(-expand => 'yes', -fill => 'both');

  return $can;
}

my $can = setupScreen();

$digits[0] = SevenSegment->new( $can,  50, 25, 50, 6 );
$digits[1] = SevenSegment->new( $can, 120, 25, 50, 6 );
$digits[2] = SevenSegment->new( $can, 210, 25, 50, 6 );
$digits[3] = SevenSegment->new( $can, 280, 25, 50, 6 );
$digits[4] = SevenSegment->new( $can, 370, 25, 50, 6 );
$digits[5] = SevenSegment->new( $can, 440, 25, 50, 6 );

dispTime( \@digits );
$can->repeat( 1000, [ \&dispTime, \@digits ] );
$can->after( 10000, [ \&alertTime, \@digits ] );

MainLoop();
Time dependent processing is implemented by defining callbacks with the methods after and repeat. As the method name implies, repeat will call the call repeatedly, whenever the given number of milliseconds has passed, whereas after defines a one-shot callback. Both methods return an identifier that can be used to cancel the delayed command before it is actually executed.
Note that any widget can be used to define such callbacks.
Tk::Canvas.
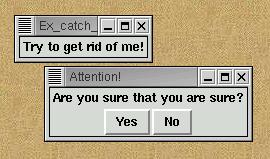
use Tk;
my( $winMain, $winDial );

# catch keyboard interrupt
#
$SIG{'INT'} = 'IGNORE';

# action when main window is destroyed
#
sub doDestroy(){
  print "bye\n";
}

# dialog when user tries to destroy main window
#
sub doDelete(){
  my $w;
  return if $winDial && $winDial->Exists();
  $winDial = $winMain->Toplevel();
  $winDial->title( 'Attention!' );
  $w = $winDial->Label( -text => 'Are you sure that you are sure?' );
  $w->pack();
  my $f = $winDial->Frame()->pack();
  $w = $f->Button( -text => 'Yes',
                   -command => sub { exit } );
  $w->pack( -side => 'left' );
  $w = $f->Button( -text => 'No',
                   -command => sub { $winDial->destroy() } );
  $w->pack( -side => 'right' );
}

# create main window
#
$winMain = MainWindow->new();
my $labA = $winMain->Label( -text => 'Try to get rid of me!' );
$labA->pack( -side => 'top' );

# bind callback for main window destroy
#
$winMain->bind( ref( $winMain ), '', \&doDestroy );

# bind callback for WM protocol message
#
$winMain->protocol( 'WM_DELETE_WINDOW', \&doDelete );

MainLoop();
Another technique that could be used alone or in addition to catching the window manager message consists in defining a callback for the '<Destroy>' event happening to the main window. This callback should execute all the actions required for saving data and clean-up.
Don't forget that there is also the possibility of aborting a program from the shell: Disabling SIGINT might be a good idea, too.
Perl/Tk supports several techniques for creating and using pictorial information on a range of widgets:
Bitmaps may be used with button, checkbutton, label, menubutton and radiobutton widgets: If the -bitmap option us used, the specified bitmap is shown instead of the labeling text. Also, with menu entries, a bitmap can be displayed instead of the entry label, so that, in general, it is not possible to have a graphic symbol appear in addition to the entry text. Finally, bitmaps can be used as canvas items.
Using the -image option, images can be used wherever bitmaps are permitted, and in a couple of additional places:
In addition to being used instead of (or in addition to) text on widgets, bitmaps and images can also be used as icons.
#define abmask_width 14
#define abmask_height 14

static unsigned char abmask_bits[] = {
 0x00, 0x00, 0x00, 0x00, 0x1e, 0x1e, 0x3c, 0x0f,
 0xf8, 0x07, 0xf0, 0x03, 0xe0, 0x01, 0xf0, 0x03,
 0xf8, 0x07, 0x3c, 0x0f, 0x1e, 0x1e, 0x1e, 0x1e,
 0x00, 0x00, 0x00, 0x00 };
To convert this to a simple ASCII text pattern, run the bmtoa
converter while using the option -chars '.1', and you'll get this:
..............
..............
.1111....1111.
..1111..1111..
...11111111...
....111111....
.....1111.....
....111111....
...11111111...
..1111..1111..
.1111....1111.
.1111....1111.
..............
..............
(Omitting the -chars option would produce an output consisting of '-' and '#' characters, but these are not as convenient for processing in a Perl program, as we shall see in the example below.)
Since there is also the inverse conversion, atobm, you don't have to save all your bitmaps in xbm format. In case you'd need to make any changes, convert the text back to xbm format (again using the -chars '.1' option), edit with bmtoa, and so on.
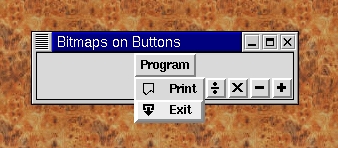
use strict;
use Tk;

my %Bitmap;
$Bitmap{bm_exit} = <<TheEnd;
..............
.11111111111..
.11111111111..
.11.......11..
.11..111..11..
.111.111.111..
.111.111.111..
.....111......
..111111111...
...1111111....
....11111.....
.....111......
......1.......
..............
TheEnd

$Bitmap{bm_print} = <<TheEnd;
..............
.11111111111..
.1.........1..
.1.........1..
.1.........1..
.1.........1..
.1.........1..
.1.........1..
.1......11.1..
.1.....11.11..
.11...1....1..
..11.1........
...11.........
..............
TheEnd

# ... more assignments to %Bitmap hash entries ...

sub setupScreen(){
  my $winMain = MainWindow->new();
  $winMain->title( 'Bitmaps on Buttons' );

  PackBitmaps( $winMain, \%Bitmap );

  my $frmMenu = $winMain->Frame()->pack();
  $frmMenu->Menubutton(
    -text => 'Program',
    -tearoff => 'no',
    -menuitems => [
      [ 'command', 'Print', -command => sub { },
                            -bitmap  => 'bm_print',
                            -accelerator => 'Print' ],
      [ 'command', 'Exit',  -command => sub { exit(0) },
                            -bitmap  => 'bm_exit',
                            -accelerator => 'Exit' ],
    ]
  )->pack( -side => 'left' );

  my $frmSel = $winMain->Frame();
  $frmSel->pack(-side => 'top', -fill => 'both', -expand => 'yes');

  my $but;
  for my $bmkey ( qw{ bm_plus bm_minus bm_times bm_divide } ){
    $but = $frmSel->Button( -bitmap => $bmkey, -text => $bmkey,
                            -command => sub { print "$bmkey\n"; } );
    $but->pack( -side => 'right' );
  }

}

sub PackBitmaps($$){
    my( $mw, $bmref ) = @_;
    for my $bmkey ( keys( %$bmref ) ){
        my @lines = split( /\s*\n/, $bmref->{$bmkey} );
        my $w = length( $lines[0] );
        my $h = @lines;
        $bmref->{$bmkey} = pack( "b$w"x$h, @lines );
        $mw->DefineBitmap( $bmkey, $w, $h, $bmref->{$bmkey} );
    }
}

setupScreen();
MainLoop();
$widget->DefineBitmap( name, columns, rows, vector )The name will be used for referring to the bitmap which has the given number of pixel columns and rows. Its appearance is defined by the vector argument, a bitstring consisting of columns times rows bits. Since writing bitstrings is not a pleasant task we use a more convenient notation for our bitmaps, where characters '1' and '.' represent bit values 1 and 0, respectively. Looking at PackBitmaps now, we see how arranging these characters neatly in rows and columns permits us to use split to separate the string into lines, to determine the height and width and, finally, to pack the character strings into a bit string:
$bmref->{$bmkey} = pack( "b$w"x$h, @lines );
The pack template uses pack code b, with appropriate
length and repetition, converting characters to bits, in the right
ordering, depending on the least significant bit of the character's
ord values. (That's why we can use '.' for zero bits - at
least on systems with ASCII encoding.) Note that the bit vector must
be allocated in some static location, for which we simply recycle
the hash entry.
The subroutine setupScreen demonstrates how to use the defined bitmaps: option -bitmap in menu item definitions and in button widget constructors simply names the bitmap.
Don't overlook the labor-saving possibility of using reverse to obtain symmetric bitmaps. To flip the bitmap upside down, use this:
my @lines = reverse( split( /\s*\n/, $bmref->{$bmkey} ) );
To achieve mirroring along the vertical axis one could do:
my @lines = map { join( '', reverse( split( //, $_ ) ) ); }
                split( /\s*\n/, $bmref->{$bmkey} );
Central symmetry (or rotation by 180 degrees) is, obtained by combining
both transformations.
Tk::Menubutton, Tk::Widget.
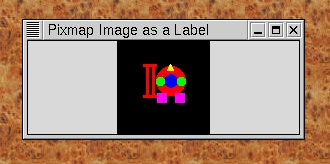
use strict;
use Tk;

sub setupScreen(){
  my $winMain = MainWindow->new();
  $winMain->title( 'Pixmap Image as a Label' );

  my $frmSel = $winMain->Frame();
  $frmSel->pack(-side => 'top', -fill => 'both', -expand => 'yes');
  my $image =  $winMain->Pixmap( -file => 'shapes.xpm', );
  my $logo = $frmSel->Label( -image => $image,
                             -width => '30m', -height => '30m',
                             -bg => 'black' );
  $logo->pack( -padx => '30m' );

}

setupScreen();
MainLoop();
Tk::MainWindow, Tk::Label.