
V 2.2
V 2.2 |
Photoshop Elements offers in opposite to its professional version no curves command. That's a pity, because curves are a valuable tool for image editing.
To remedy this shortcoming this site offers the plugin SmartCurve to upgrade this ability. Of course this plugin can be used from all programs which can integrate Photoshop plugins.
Please read the help provided by the program to learn all features and functions of SmartCurve.
This plugin is useful not only for Photoshop Element user, since it offers solid curve adjustment beyond the ability of many other programs.
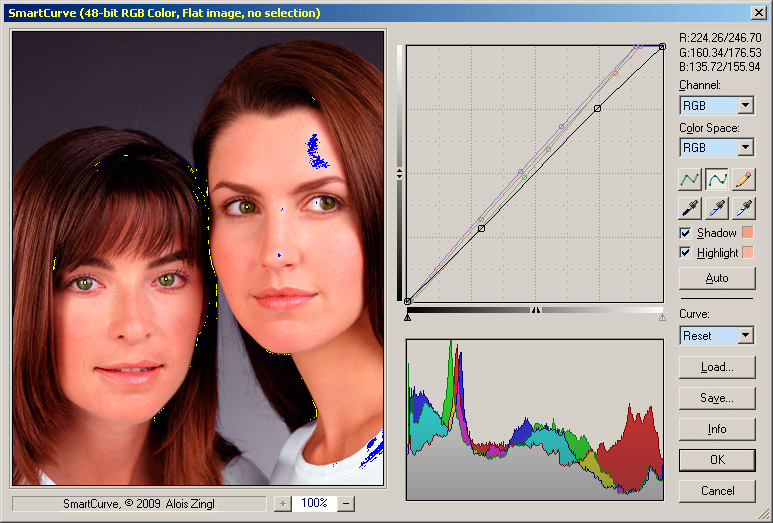 |
The dialog "curve" is arranged in three parts. Left is the preview window, in the center is the input graph with the histogram below und at right are the controls.
Information about curves are available at The Gurus Network http://www.gurusnetwork.com/tutorial/curves/, Cambridge in Colour http://www.cambridgeincolour.com/tutorials/photoshop-curves.htm or earthboundlight photo tips: Photoshop Curves.
At the beginning the graph shows a straight diagonal line. The horizontal axis of the graph represents input levels; the vertical axis represents output levels. The curve charts the relationship between input and output levels.
Click in the graph to add points to the curve. The points get connected with a spline interpolation. An exception is one additional point (three points at all). In that case the more useful gamma correction is used instead. If that is not wanted one additional point must be set.
A point can be dragged with the pressed mouse key and deleted with a right mouse click. Alternatively the point is also deleted with the control key plus a left mouse click.
There is one graph for the main color channel (RGB) and one channel for every single color red, green, and blue. Click on the text 'Channel' to cycle easily through all color channels.
The points of the graph can be set directly without interpolation with the pencil tool
 .
.
The brightness bar below the graph shows the effect of the transformation. If it is clicked the graph is reversed.
The preview windows shows the effect of the transformation of the image. If the right mouse key is pressed the original image is visible for comparison. The image can be dragged with the right mouse key.
At the left top of the dialog the values of the color are visible. The numbers also show the higher precision of the pixel in the 16 bit mode.
Shadows  and highlights
 can be set to minimal
and maximal value with the eyedropper tool.
To remove a color cast use the midtone eyedropper
can be set to minimal
and maximal value with the eyedropper tool.
To remove a color cast use the midtone eyedropper
 and click at a point on the
image which should be neutrally gray. The gamma value of the curves will be
adjusted to reach that objective.
and click at a point on the
image which should be neutrally gray. The gamma value of the curves will be
adjusted to reach that objective.
Sometimes it may be necessary to remove a color cast of more than one color, for example of a metallic color going from dark to light. If the midtone eyedropper is applied to the middle gray a slight yellow color cast my be left on the light gray and a slight blue color cast on the dark gray. SmartCurve therefore allows to set more than one midtone. By holding down the Alt key when setting the midtone, the previously set midtones are not deleted. Hence it is possible to set multiple midtones.
If you press the shift key while picking a color, a 3x3 sample average will be used; with the control key a 5x5 sample average will be taken.
The eyedropper tool can also be used to apply a color cast. If there is no gray color in the image double click (or a right mouse click) at the midtone eyedropper. The color selection dialog pops up to enter the target color. So you can select the color to which the color cast is later applied. This works for shadows and highlights too.
The function 'Auto' sets shadows and highlights according to the histogramm of the preview window. It cuts 0.1% of the lower and higher end of the pixels.
If the Shift-key is pressed, all channels are adjusted by the same value, so that the hue of the image does not change (Auto-contrast).
The histogram shows the number of colors according to their color. It can be used to judge the brightness distribution of the image.
The data for the histogram are always taken from the preview window. If it changes by dragging or zooming the histogram also changes.
The small horizontal lines in the histogram suggest the number of pixels. They are every 10, 100, 1000, etc. Pixels.
Adjusting 8-bit images gaps und overlaps are visible in the histogramm, making it hard to read. Therefore the Plugin uses a Smart algorithm with an advanced color range. This makes the histogramm for 8-bit images quick and easy readable. Just click at the histogram to switch between Normal and Smart Histogram. This does not change the image.
 Normal Histogram |
 Smart Histogram |
At the left a normal histogram is visible after a curve adjustment like it is delivered by Photoshop; at the right with the same adjustments the Smart Histogram.
The color space for curve editing can be selected, so its possible to adjust for example lightness in Lab or HSL without changing the color or saturation.
The curve can be adjusted in the color spaces RGB, CMY, L*a*b*, HSB, HSL, LCH, YCrCb and YUV.
Its also possible to change the view and edit of the curve from pixel values to percentage.
By adjusting the curve it could happen that a color gets into saturation by having reached its maximum or minimum value. To make such color clipping visible, these pixels are painted in a different color if Shadow or Highlight is activated. The used color for clipping can be adjusted by clicking at the colored box.
Only the color of the selected channel is replaced.
SmartCurve could be used non-distructive as a smart filter in Photoshop CS3. This feature works for all filter plugins even if they do not support it.
To enable it you need to choose File > Scripts > Browse in Photoshop CS3, navigate to C:\Program Files\Adobe\Adobe Photoshop CS3\Scripting Guide\Sample Scripts\JavaScript and load EnableAllPluginsForSmartFilters.jsx. You will be prompted if you want to enable all filters as smart filter. Press OK.
Now you will be able to use all filter plugins, including SmartCurve plugin as smart filters. SmartCurve will not store the filter settings in the smart object, but the settings can be saved permanently in a file or temporarily as a snap shot (with shift save).
The actual version V2.2 of the plugin for Windows can be downloaded here (1.4 MByte): smartcurve.zip. It works with all versions of Photoshop and includes two versions for 32-bit and 64-bit Photoshop respectively. The 64-bit version is still in development and can cause a crash of PhotoShop. At the moment there is no solution for this problem, sorry.
Simply extract the files and put them into the plugin directory of Photoshop (something like C:\program files\adobe\Photoshop Elements\plug-ins. After the next restart a new entry easy.Filter/SmartCurve should appear in the Filter menu.
Instead of storing the files in the fixed folder it's possible to save them in any folder and tell PhotoShop to use it by: Edit > Preferences > Plug-Ins & / Additional Plug-In Folder. Set the check box and select the folder where you stored SmartCurve.
Sometimes Windows blocks the display of the help file (smartcurve_e.chm). The reason for Windows is that the file comes from an unsecure internet source and execution is prohibited, depending on the security settings. Solution: Run Windows Explorer, right-click on the CHM file, and select Properties from the popup menu. Click on the Unblock button immediately below the Advanced button on the General page. Click Apply to show the content. Once the CHM file has been unblocked, the Unblock button disappears. Another way would be to temporarily copy the help file to a non-NTFS device like an USB-stick to get rid of the blocking 'source' information of the file.
The development kit for plugins like SmartCurve (FilterMeister) is only available for Windows. Hence there will be no Mac version in the near future, sorry.
ElementsXXL for Windows by Harald Heim adds up to 640 powerful features to Photoshop Elements.
Another description of SmartCurve (and other useful tips) can be found on Earthbound Light by Bob Johnson.
There is another alternative for all user of Photoshop Elements Version 3.0 or earlier
to use curves non-destructive as adjustment layer:
The Grant's Tools:
http://www.cavesofice.org/~grant/Challenge/Tools/Files.html.
Also explained at
http://www.earthboundlight.com/phototips/photoshop-elements-curves.html.
Unfortunately this method doesn't work under Photoshop Elements V4.0 or higher anymore.
This and other useful features were discovered by Richard Lynch in The Hidden Power of Photoshop Elements. There are also some powerful techniques and tool additions to Photoshop Elements V4.0 available on his site.
Elements+ by Andrei Doubrouvski powers up Photoshop Elements by revealing the most of undocumented functions inherited from full Photoshop.
Tips and Tools for imaging tools are available at Ralph Altmanns SimpleFilter.
The author provides this software as is and makes no warranty about its operations. By installing this plugin, the installer assumes all the risks of installing and using this software.
Of course the author is grateful for suggestions and hints. Email: 
This software is freeware. This means that it is completely free for anybody to use without any limitations. This software is owned completely by the author. Since this software is intended to be freeware, the author does not authorize the sale of this software. The program may be freely distributed without royalty as long as it is distributed in the form of the original file. The program may be distributed as part of a software package, as long as it is explicitly stated as a collection of shareware or freeware, no extra fee is charged for inclusion of this freeware and it is reported to the author.
Copyright © Alois Zingl, Vienna, Austria, Email: , last update October 2016.